Introduction
The ZFS appliance that is internal to Exalogic has been configured specifically for the rack, however while it is "internal" there are still a number of configuration options that should be considered when setting up a machine for production usage. This blog posting is not an exhaustive list of all the security settings that can be done for a ZFS appliance but does pick off some configuration values that should be thought about whenever the appliance is being setup for use.User Security
Once an Exalogic rack has been installed by default there will be a single root user of the ZFS array defined. It is likely that other roles may need to create and manage storage space for their specific accounts. Handing out the root privileges to other users is not recommended.The permissions are determined via a three layered system.
- Authorizations
- Configuration items have CRUD (Create, Read, Update, Delete) like actions that can be taken.
- Roles
- Each role defines a number of authorizations that can be performed by a user with that role
- User
- Defines either a local or remote directory based user that is allowed to authenticate to the ZFS appliance, the roles and hence authorizations will determine which activities the user is able to perform.
Consider a scenario where the vDC is to be setup with an account that will host all vServers for Application A, the application may require some shares created to host the binaries and configuration files. The machine administrator can initially create a project, say called application_a. Then the role for administrating the project can be created. To do this click on Configuration --> Users and click on the + symbol beside the Roles to create a new role.
 |
| Create role to administer shares for a specific project |
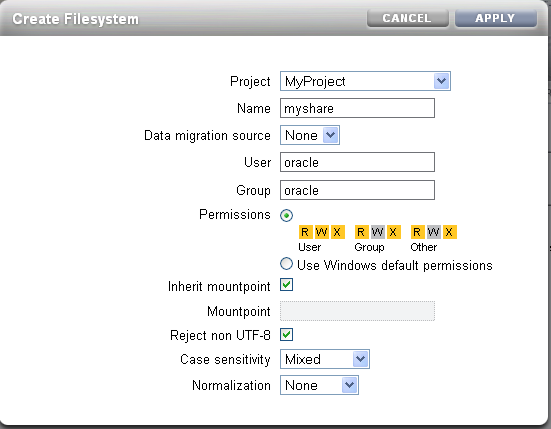
Having created the role we now need to create a user and allocate the role to that user.
 |
| Creating a user with restricted permissions |
In the example shown above we create a local user that will only have the role to administer the Application A project as limited by the selection of the roles associated with the user.
Should that user then attempt to make a change to anything other than their project/share the system will respond with the following message.
 |
| Error reported when the authorisation has not been granted. |
Project/Share Security
Having defined a user with limited access to the ZFS device we now turn our attention to the configuration that provides a level of security to help prevent malicious attacks on an NFS mounted share. Most of the configuration settings for a share can also be set at the project level, as such we will discuss these first and remember that if necessary the inheritance can be overridden to give an individual share a unique configuration.- General
- Space Usage
- The quota can be used to prevent any shares in this project from exceeding a set size. Handy to set to ensure that this project does not use all the available disk space on the device.
- Mountpoint
- Not strictly a security feature but it is good practice to always ensure that the project has a unique mountpoint defined. By default a share will append the share name onto the project's mountpoint to determine the location in the ZFS appliances directory structure the data for the share. A format that we use is to have all shares given a mount point of /export/<project name>/<share name>
- Read Only
- Obviously not possible in many cases but certainly at the share level you may wish to have the share setup as Read/Write initially and then change it to be read only so that users cannot accidentally delete the data on it. (For example a binaries only filesystem.) During upgrades it could be switched back to read/write for the duration of the patching.
- Filesystems - LUNS
- Not directly applicable for Exalogic today but certification to use the iSCSI facility of the ZFS appliance is underway. At which point then setting the user, group and permissions for LUNs created will be required.
- Protocols
- NFS
- Share Mode
- Set to None so that by default a client cannot mount the filesystem unless they have specifically been given permission as an exception
- Disable setuid/setgid file creation
- Really down to the usage of the filesystem - see wikipedia for details on setuid/setgid.
- Prevent clients from mounting subdirectories
- Obviously security related but it will be up to the individual usecase to determine appropriate usage.
- NFS Exceptions
- Having set the share mode to None the usage of NFS Exceptions to allow clients to mount the share is mandatory. There are three mechanisms available to restrict access to a particular host or set of hosts. Restricting by Host with a fully qualified domain name, by DNS domain or by network.
In general I have found the restriction by network to be the most useful but that is partly because DNS domains are often not used when setting up for short term tests. When using the Network Type specify the "entity" to be a network using the CIDR notion. So for example, I might want to restrict the share to only vServers in the network range 172.17.1.1 through to 172.17.1.14 in which case the entity should be set to 172.17.1.1/28. The netmask can be taken down to an individual IP address /32 if only one vServer is allowed to mount the share.
The access mode set to read/write or read only as is needed for the share usage.
Root Access indicates if the root user on a client machine would have the root access to files on the share. In general NFS terminology this is known as root squash.
 |
| Example NFS setup |
- HTTP, FTP & SFTP
- Leave with share mode of None unless there is a specific need to allow these protocols to access data held on the share.
- Access
- This is a tab that has specific information for a share (other than the ACL Behaviour) so should be set independently for each share. The Root Directory Access specifies the user/group and the file permissions that will be applied to the share when mounted on the client machine. If using NFSv4 and hence some sort of shared user repository then the user and group are validated against this store, otherwise you can use values such as nobody:nobody to specify the user:group or enter the UID/GID of the users. These IDs must map onto a user:group ID in the client machine. The directory permissions set according to the needs of the application.

- ACL
- Very fine grained access to files and directories is managed via Access Control Lists (ACLs) which describe the permissions granted to specific users or groups. More detail available from Wikipedia or in the NFSv4 specification (page 50) that is supported by the ZFS appliance. In general I have found the default settings have been enough for my needs where the world can read the ACLs but only the owner has permission to change/delete them.
Administration Security
The ZFS appliance has many configuration settings however to lock down the appliance it is possible to turn off a number of the services or re-configure them from the default to minimise risk of intrusion.- Data Services
- NFS
- On a physical Exaloigc you can specify only to support NFSv4 however on virtual NFSv3 is used by the control stack so must remain a supported version.
- When using NFSv4 it is also necessary to specify the identity domain. (See my earlier posting about setting up LDAP to use for shared authentication.)
- iSCSI - If not used then disable the service. (As of Exalogic 2.0.6.1.0 iSCSI is only supported for the Solaris Operating System. In future releases it will also be supported for Linux/virtualised racks.)
- SMB, FTP, HTTP, NDMP, SFTP, TFTP can all be disabled unless specifically needed for some function. (For example, I quite often use the HTTP service to allow easy access to some media files or to host a yum server.)
- Directory Services
- Generally use either NIS, LDAP or Active Directory for a shared identity store. Turn off the services you are not using.
- System Settings
- Most of the system settings are useful to have enabled on the rack. The default settings of having Phone home and Syslog disabled are the best bet.
- Remote Access
- SSH is almost certain to be required to administer the device via the CLI and using scripted configurations. However if you setup another user with all necessary permissions then it is possible to change "Permit root login" to deselect this option. This means that it will no longer be possible to use the root account to ssh onto the rack. NOTE - If using exaBR, exaPatch, exaChk etc. then these rely on ssh access as root so the flag would need to be toggled back prior to running these tools.
 |
| Preventing administration on a particular interface |
The effect of deselecting "Allow Administration" on the interface means that a browser will see an "Unable to connect" error and if the ssh interface is used then the following message is shown.
| # ssh donald@172.17.0.9Password: Password: Last login: Tue Feb 18 11:51:00 2014 from 138.3.48.238 You cannot administer the appliance via this IP address. Connection to 172.17.0.9 closed. |
Summary
In conclusion, there are actually relatively few actions to be taken from the default settings of an Exalogic ZFS appliance but the following should always be considered:-- Setup users to administer the projects and shares that are limited to only have write access to the shares they need.
- For each share make certain that only the protocols that are needed are allowed access (normally NFS only, and potentially iSCSI in the future) and ensure that only specific hosts are allowed to mount the shares
- Prevent administration on the networks that are connected to guest vServers.