Showing posts with label backup and recovery. Show all posts

Friday, 31 October 2014

Disaster Recovery of WLS Applications on Exalogic

Introduction

For many years Oracle Fusion Middleware based on WebLogic server has been capable of being used to provide high availability, fault tolerance and disaster recovery capabilities.  This has been documented as part of the Maximum Availability Architecture whitepapers. Follow this link for all the MAA documentation or follow this link to go directly to the Fusion Middleware Disaster Recovery architecture documentation.

Exalogic/Exadata provides an ideal platform on which these architecture can be realised with all the advantages that come with using Oracle Engineered systems.

This blog posting gives a very high level overview of the principles used in implementing active/passive DR for a fusion middleware application.  Much of the activity involved from an application perspective is identical irrespective of the deployment being on physical or virtual hardware.  In this article we will have a slightly deeper dive on how the Exalogic ZFS storage appliance is used to enable the DR solution.

Basic principles involved in setting up FMW DR

The basic tenet of deploying an application is to follow a set of rules during the deployment/configuration of the application which will make it simple to start the application up on the DR site.  The setup should be:
  1. Deploy all tiers of the application ensuring:-
    1. In the primary environment a set of hostname aliases are used for all configuration, these aliases not linked to the specific host and all configuration in the products specify these names rather than actual IP addresses.
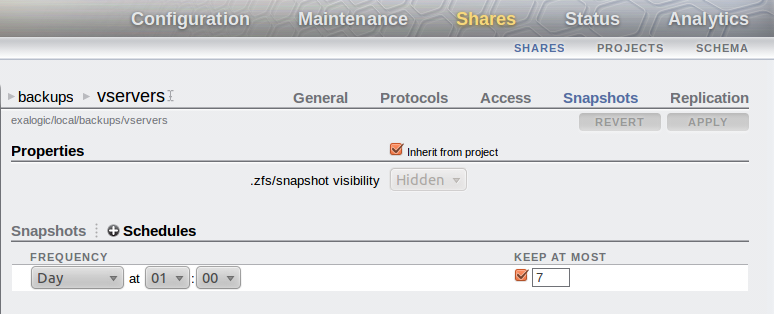
    2. The binary files and application configuration  (normally the domain homes) are all located as shares on the ZFS appliance and mounted via NFS to the Exalogic vServers.
    3. Critical application data that must be persisted goes into the Database.  Specifically thinking of the WebLogic Transaction logs and the JMS messages.  (We will use the Oracle Data Guard product to ensure critical data is synchronously copied to the remote site)
    4. Keep the configuration in the Operating System to an absolutely minimum possible.  Probably no more than /etc/hosts entries and if needed specific service startup commands.  Other OS configuration should be built into the templates used to create the environment in the first place.
  2. Create mirror vServers on the DR site.
    1. These vServers will be used to host the production environment when DR has occurred.  The same minimal OS configuration should be present in this site.  To save time in DR the servers can be started up or they can be started on-demand at DR startup.  If already running then ensure that the application services are all shutdown.  The hosts files must have the same hostname aliases in it that the primary site has but obviously they will be resolving to different IP addresses.
  3. Create a replication agreement for all the shares that host the application binaries and domains.
  4. When DR is to happen   (ignoring DB)
    1. Break the replication agreement
    2. Export the replicated shares so that they can be mounted.
    3. Mount the replicated shares in exactly the same location on the DR vServers
    4. Startup the application on the DR environment
    5. Test and if OK then redirect traffic at the front end into the DR service.
Obviously this is somewhat simplified from most real world situations where you have to cope with managing other external resources, lifecycle management and patching etc.  However the approach is valid and can be worked into the operations run book and change management processes.

All these steps can be automated and put into the control of Enterprise Manager such that the element of human error can be removed from the equation during a disaster recovery activity.

Using the ZFS Storage Appliance for Replication

From the application perspective a key function lies with the NAS storage which has to be able to copy an application from one site to another.  The ZFS Storage appliance within an Exalogic is a fantastic product that provides exactly this functionality.  It is simple to set it up to copy the shares between sites.

Setup a Replication Network between sites

The first activity required when wishing to perform DR between two sites is to create a replication network between the ZFS appliance in both Exalogic racks.  This can be done using the existing 1GbE management network that already exists, however this is not recommended as this network is not fault tolerant, there being only one 1GbE switch in the rack.  However on the ZFS appliance there are two 1/10GbE network connections available on the back of each storage head (NET2 & NET3).  By default one connection goes into the 1GbE switch and the other is a dangling cable, thus two independent routes into the data centre are available.  If a longer wire is required to connect then it is possible to disconnect the existing ones and put in new cables.  (Recommendation - Get Oracle Field Engineers to do this, it is a tight squeeze getting into the ports and the engineers are experts at doing this!)

Once each head is connected via multiple routes to the datacenter and hence on to the remote Exalogic rack then you can use link aggregation to combine the ports on each head and then assign an IP address which can float from head to head so it is always on the active head and hence has access to the data in the disk array. 

Replicating the shares

Having setup the network such that the two storage appliances can access each other we now go through the process of enabling replication. This is a simple case of setting up the replication service and then configuring replication on each project/share that you want coped over.  Initialy setup the remote target where data will be copied to.  This is done via the BUI, selecting Configuration, and then the Remote Replication.  Click on the + symbol beside "Targets" to add the details (IP address and root password) of the remote ZFS appliance.

Adding a replication target
Once the target has been created we now setup the project/share to be replicated.  Generally speaking I would expect a project to be replicated which means that all the shares that are part of the project will be replicated, however it is possible to replicate at the share level only for a finer granularity.
To setup replication using the BUI simply click on the Shares and either pick a share or click on the Projects and edit the project level.  There is then a replication sub-tab and you can click on the "+" symbol to add a new "Action" to replicate. 

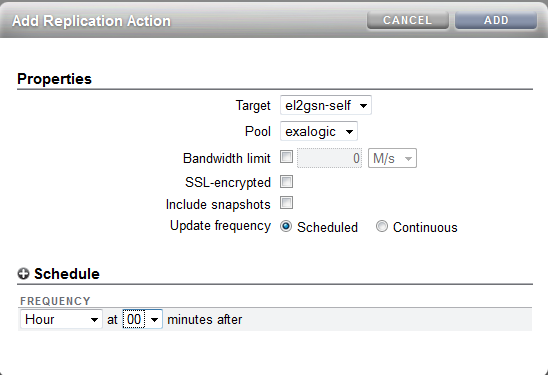
Replication of a project
Simply pick the Target that you setup earlier in the Remote Replication agreement, pick the pool - which will always be exalogic - and define the frequency.  Scheduled can be down to every half hour or Continuous means that it will start a new replication cycle as soon as the previous one completes.  There are a couple of other options to consider, Bandwidth limit so that you can prevent replication swamping a network, "SSL encryption" if the network between the two sites is considered insecure and "Include Snapshots" which will copy over the snapshots to the remote site. 

Obviously the latter two options have an impact on the quantity of data copied and the performance is worse if all data has to be travelling encrypted.  However, after the initial replication only changed blocks will be copied across and given that the shares are used primarily for binaries and configuration data there will not be a huge quantity flowing between the sites.

Process to mount the replica copies

Having completed the previous steps we have the binaries and configuration all held at the primary site and a copy on the remote site.  (Although bear in mind that the remote copy may be slightly out of date!  It is NOT synchronous replication.)  For DR we now assume that the primary site has been hit by a gas explosion or slightly less dramatic we are shutting down the primary site for maintenance so want to move all services to the DR environment.  The first thing to do is to stop the replication from the primary site.  If the DR environment is still running then this is as simple as disabling the replication agreement.  Obviously if there is no access to the primary then one must assume that replication has stopped.


Then on the DR site we want to make the replicated shares available to the vServers.  This is acheived by "exporting" the project/share.  To navigate to the replica share simply select the Shares and then the Projects listing or Shares listing appropriately.  Under the "Projects" or "Filesystems : LUNs" title you can click to see the Local or Replica filesystems.  By default the local are shown so click on Replica to see the data coped from a remote ZFS appliance.

Replicated Projects
We can then edit this project as you would for a local project.

Under the General tab there is the option to "Export", simply select this check box and hit apply and the share will be available to mount by the clients.  By default the same mount point that was on the primary site will be used on the DR site.

Health Warning : When you export a project/share then all shares with the same directory mount point are re-mounted on the client systems.  Make sure every project has a unique mount point.  If left at the default of /export then the Exalogic Control shares are also re-mounted which has the impact of rebooting compute nodes.  

Export checkbox to enable share to be mounted

Once the shares have been exported then the DR vServers can mount the shares, start the application services up and be ready to pick up from the primary site.  Finally, create the replication agreement to push data from the DR site back the primary until the failback happens to the primary site.

All the steps for DR once the environment has been correctly setup only take in the order of seconds to complete so the outage for the DR switchover can be taken down to seconds for the technical implementation aspects.


Wednesday, 5 December 2012

Backing up an Exalogic vServer via templating the vServer

 Introduction


Following on from my earlier post about backing up a vServer using the rsync command  it is also possible to effectively backup a vServer by using the capability to template it. This is documented in appendix F of the Cloud Administrators guide however an example process is documented here to create a template and re-create a vServer from this template.

A really useful little script has been created by the Exalogic A-Team that could save you some time and effort in templating a vServer.  It is available for download from here.   To do it manually read on....

The vServer we will be using to perform the actions on is the same one that we have done a backup with using rsync.  Namely a vServer that has been configured to perform an rsync backup and has an additional partition over and above the Exalogic base template mounted on /u01 that contains a deployment of Weblogic.

The general steps to follow are:-
  1. Shutdown vServer
  2. Clone in OVMM
  3. Startup cloned image
  4. Log on and edit to remove configuration
  5. Shutdown
  6. Copy files to create a template
  7. Import template to Exalogic Control
  8. Delete previous vServer
  9. Create new vServer based on new template
  10. Check operation.

Shutdown/Clone Operations (Backup)

The first step is simply to shutdown the vServer, this can be done from Exalogic Control. Then we switch context to log in to OVMM in order to perform the cloning activity. Below is a screenshot of the clone process in OVMM.


As you can see we do not clone as a template but clone the machine as a vServer. This is because we will make changes to the new vServer so that it can become a template for Exalogic Control.  Thus once the job to clone the machine has completed we can then go in and start the server up. The behaviour is to automatically assign the cloned vServer into the target server pool that was selected, however it will be stopped by default. By highlighting the pool and selecting the "Virtual Machines" tab we are able to select our newly created clone and start it.

Once the machine has started it is possible to log onto the cloned vServer using the IP address of the previous instance. Log on as root and now we want to make a number of changes to the configuration files so that it becomes an "unconfigured" vServer, ready to be imported as a template into Exalogic Control. The changes to perform are described below.

Action 
Detail 
Edit and /etc/sysconfig/ovmd file and change the INITIAL_CONFIG=no parameter to INITIAL_CONFIG=yes. Save the file after making this change.

Remove DNS information by running the following commands:
cd /etc
sed -i '/.*/d' resolv.conf
Remove SSH information by running the following commands:
rm -f /root/.ssh/*
rm -f /etc/ssh/ssh_host*
Clean up the /etc/sysconfig/network file by running the following commands:
cd /etc/sysconfig
sed -i '/^GATEWAY/d' network
Clean up the hosts files by running the following commands:
cd /etc
sed -i '/localhost/!d' hosts
cd /etc/sysconfig/networking/profiles/default
sed -i '/localhost/!d' hosts
Remove network scripts by running the following commands:
cd /etc/sysconfig/network-scripts
rm -f ifcfg-*eth*
rm -f ifcfg-ib*
rm -f ifcfg-bond*
Remove log files, including the ones that contain information you do not want to propagate to new vServers, by running the following commands:
cd /var/log and remove the following files
messages*, ovm-template-config.log,ovm-network.log, boot.log*, cron*, maillog*, messages*, rpmpkgs*, secure*, spooler*, yum.log*
Remove kernel messages by running the following commands:
cd /var/log
rm -f dmesg
dmesg -c
Edit the /etc/modprobe.conf file and remove the following lines (and other lines starting with alias bond):
options bonding max_bonds=11
alias bond0 bonding
alias bond1 bonding
Edit the /etc/sysconfig/hwconf file and modify the driver: mlx4_en entry to driver: mlx4_core. Save the file after making changes.

Remove the Exalogic configuration file by running the following command:
rm -f /etc/exalogic.conf
Remove bash history by running the following commands:
rm -f /root/.bash_history
history -c

Once completed stop the vServer from the command line. Then log onto one of the hypervisor compute nodes. What we need to do is copy the disk images and the vm.cfg file from the OVS repository into a scratch area where we will create the template.  The simplest mechanism to achieve this on an Exalogic rack is by placing them onto the handy ZFS appliance. This can be made available via HTTP to Exalogic Control to upload the template. Thus the steps to follow are:-
  1. Mount a share on the compute node
    # mkdir /mnt/images
    # mount <ZFS Appliance IP>:/export/common/images /mnt/images
  2. Under the /OVS/Repositories directory will be a unique ID then a directory called VirtualMachines. Under this directory will be multiple directories named by their identifiers. Each with a vm.cfg file contained within. This is one of the files that we need to copy to the scratch area.
    # cd /OVS/Repositories/*/VirtualMachines
    # grep -i simple */vm.cfg
    This will enable you to spot the name of the cloned vServer and hence identify the correct vm.cfg file.
  3. Copy the cloned vServer vm.cfg to the scratch area.
    # cp vm.cfg /mnt/images
  4. Inside the vm.cfg file is a line that specifies the disks involved. Copy the disk image into the scratch area.
  5. Create the template by simply creating a tar.gz file from the config file and the disk image.
    # cd /mnt/images
    # tar zvcf my_template.tar.gz vm.cfg <disk image ID.img>

Startup/Create Operations (Restore)

Now load up the template into Exalogic control and create a vServer from it. If the new vServer looks to match in perfectly with the old one and all your testing proves a successful duplicate then all we need do is a tidy up exercise:-
  • Delete the image file and config file from the location where we created the template. (You may want to delete the template as well although it might be worth keeping it as a historical archive.  It will depend on how much free storage space you have.)
  • Delete the clone from OVMM. Make sure you mark all the volumes to be deleted.

For more complicated deployments it is likely that if you are moving your vServer to a new rack or recreating another instance there may be changes required to configuration held on disk to correct things such as IP address changes, mounts in /etc/fstab, /etc/hosts file etc.

Advantages/Disadvantages of this approach

Using the template capability has both advantages and disadvantages and it will depend on what you are aiming to achieve as to what backup approach you use.


Advantages Disadvantages
Ability to make the backup portable to any Exalogic rack The existing vServer must be shutdown, making its service unavailable for a period of time.
A simple process Not able to recover individual files and directories without going through an entire process of creating another vServer and copying files back from this newly created vServer.
Intensive work required to script up for automated backup.

Tuesday, 27 November 2012

Backup and Recovery of an Exalogic vServer via rsync

Introduction

On Exalogic a vServer will consist of a number of resources from the underlying machine. These resources include compute power, networking and storage. In order to recover a vServer from a failure in the underlying rack all of these components have to be thoughts about. This article only discusses the backup and recovery strategies that apply to the storage system of a vServer.

There are three general approaches that can be applied to the backup and restore process of a vServer. These being:-
  1. Use the ZFS storage capabilities to backup and restore the entire disk images.
  2. Use a backup mechanism, such as rsync, to copy data from the root disks of the vServer to a backup storage device.
  3. Template the existing vServer on a regular basis and use this template to create a new vServer to restore.

Backup using ZFS appliance to backup full disks

This approach essentially makes use of the ZFS appliance to create a backup of the entirety of the ExalogicRepo share and taking a copy of the full disk images. The restore is then done via a process of recovering the root disks and any additional volumes for a vServer and replacing the existing images. As a process it is fairly simple to implement but has some limitations, for example it does not enable the migration from one rack to another, or even the moving to a different physical host within a rack is involved. Similarly restoring individual files or filesystems would mandate starting up the backup copying the files off, shutting it down and reverting to the original and copying the file in.
To be certain of not having a corrupted backup it would also be necessary to ensure that the vServer being backed up is not running at the time that the backup/snapshot is taken.

Backup using backup technology from the vServer - rsync

Introduction

This approach makes use of a backup capability within the Linux environment of the vServer itself. Very much a "standard" approach in the historical physical world where a backup agent is installed into an operating system, this agent backups all the files to a media server. There are many products that provide these services from all the main backup vendors. In this example we will consider using the linux command rsync to provide the capability to backup to the ZFS appliance.

Backup using rsync & ZFS Appliance snapshot capability

The backup process incorporates configuring both the ZFS appliance and the vServer that is being backed up. The process to follow is
  1. Create backup share and configure it to regularly snapshot
  2. Mount backup share on vServer (Using NFS v3)
  3. Issue the rsync command to backup full server on a regular basis. (cron)

Create Backup share

The first activity is to create a project/share to hold the backups of the vServers. Once the filesystem has been created then ensure that you setup the system to automatically create regular snapshots of the share. In the graphic below the share has been setup to snapshot the system daily at 1am and to keep 1 week's worth of snapshots on the storage appliance.


You should also setup replication to push the backups to a remote location for safekeeping. This is a simple activity of setting up a replication target under the Configuration/Services/Remote Replication tab then for the share (or at a project level) define the replication settings.
Make sure the share has root squash enabled. (root access in an NFS exception)

Mount the share on the vServer

It is now possible to mount the share on the vServer. This can be done dynamically at the point in time when the backup is performed or via a permanently mounted share.
It is necessary to mount the share using NFS v3. This is because there are a number of specialist users that will be setup on the vServer with ownership of certain filesystems. (eg. the ldap user) Because NFS v4 has a user based security check then these files may fail to backup successfully so NFS v3 is a better bet.

If using a permanent mount point defined in /etc/fstab then there should be a line similar to that shown below.
...
<IP/Host of storage appliance>:/export/backups/vservers /u02/backups nfs rw,bg,hard,nointr,rsize=131072,wsize=131072,tcp,vers=3 0 0
...

However general advise would be to mount the share specifically for the backup then umount it so that under normal usage of the vServer the backup is not visible to users of the system. This is the mechanism that the linked script uses.

On an Exalogic the initial backup of a simple vServer that has nothing but a deployment of WebLogic took just over 6 minutes for the first backup. Subsequent backups make use of the intelligence built into rsync to only copy changes to the backup version, thus following copies were completed in ~30 seconds. Obviously if there had been a lot of changes to the files then this number would increase towards the original 6 minutes.

vServer configuration for backing up

rsync is a fairly simple command to use, however the setup required to ensure it is configured to copy the correct files to an appropriate remote location is more complex. The basic command to use is shown below with the restore being a reversal of the command.

# rsync -avr --delete --delete-excluded --exclude-from=<List of files to exclude> <Backup from> <backup to>

However to simplify the setup I have created a short script that makes use of the Exalogic ZFS appliance and excludes files appropriate for the Oracle Linux base image. The script I used can be found here and its usage is shown below
donald@esat-df-001 :~/consulting/oracle/exalogic/bin/backup/rsync$ ./rsync_backup-v1.0.sh -help
rsync_otd_backup.sh 
-action=(backup|restore) : [backup]
-nfs_server=<IP of NFS storage device> : [nfs-server]
-nfs_share_dir=<Directory of NFS share> : [/export/backups/vservers]
-mount_point=<Directory of mount point on local machine> : [/mnt/backups]
-backup_dir=<root directory for backups under the mount point> : [esat-df-001]
-directory_to_backup=<Source directory for backing up.> : [/]
-automount
-script

If automount is not specified the system will assume that the mount point defined already exists
-script is used to indicate that the script is run automatically and should not prompt the user
for any input.

Each parameter can be defined from the command line to determine the configuration, however if called automatically (from cron for example) you must include the -script option, otherwise it will prompt for confirmation that the configuration is correct.  The defaults are all setup within the script itself, inside the setup_default_values function at the top, these should be changed to suit your environment.  Similarly the function create_exclusion_list contains a list of files/directories that will not be backedup/restored.  Primarily because these directories are specific to devices attaches, temporary or cache files. The list here is what I have found works using Oracle Linux 5.6 but will need to be reviewed for your environment.
To perform the backup the simplest approach is to setup cron to run the job. I was using a backup run hourly, with the ZFS appliance keeping a copy on a daily basis but the specific needs for backup frequency will vary from environment to environment. An example of the crontab file used is shown below.
[root@esat-df-001 ~]# crontab -l
10 * * * * ./rsync_backup.sh -action=backup -script -nfs_server=172.17.0.17 -nfs_share_dir=/export/backups/vservers -mount_point=/mnt/backups -backup_dir=esat-df-001 -directory_to_backup=/
[root@esat-df-001 ~]#


Restore using rsync

The restore process is approximately a reverse of the backup process however there are various options that make this approach flexible. These being:-
  1. The ability to restore individual files or filesystems to the vServer
  2. A complete restore from backup of vServer
  3. The recreation of a vServer on another host/rack, restoring to the values defined in the backup.
These options can all be fulfilled by the use of rsync with varying degrees of manual intervention or different restore commands.

Recreating a vServer and restoring from backup

Should a vServer become corrupt or deleted (deliberately or accidentally) then it may be necessary to recreate the vServer from a backup. Assuming that the vServer is to have at least its public IP address identical to the previous server then the first activity is to allocate the same IP address to the new vServer that is will be created. This is done by simply allocating the IP address and then during the vServer creation process defining the network to have a static IP address.


Ensure that the vServer you create has a similar disk partitioning structure to the original. Perfectly OK for the partitioning to be done differently but it will be necessary to make changes to the backed up /etc/fstab file to match the new vServer layout and to perform the file system creation and same mount points.
Thus the activities to perform/consider on creation are:-
  1. Ensure the disk size/additional volumes are created as needed.
  2. Allocate IP address for any IPs that are to be recreated in the new vServer. Statically assign them to the vServer during creation.
  3. After first boot
    1. Format and mount volumes/additional disk space as needed.
    2. For all the NFS mounts that were on the previous vServer re-create the mount points. (All defined in the backup copy of /etc/fstab)
    3. Ensure disk partitions/volumes are mounted such that the vServer has similar storage facilities to the original.
  4. Restore from backup.
  5. Edit files to correct for new environment
    1. Edit /etc/hosts to make changes as necessary to any IP addresses appropriate to new vServer/environment
    2. Check the /etc/fstab file to correct according to new partitioning/volumes attached if changed from original
  6. Reboot & test
Point 4 is where the rsync command is run to create a backup, if you are wanting to backup to one of the earlier snapshots then make sure that you use the ZFS appliance to create a new share from one of the snapshots and then use that share to mount the backup and copy the files onto the new vServer.

Backup by Templating an existing vServer (A later blog post....)