Introduction
On
Exalogic a vServer will consist of a number of resources from the
underlying machine. These resources include compute power, networking
and storage. In order to recover a vServer from a failure in the
underlying rack all of these components have to be thoughts about. This article only discusses the backup and recovery strategies that apply to the storage system of a vServer.
There are three general approaches that can be applied to the backup and restore process of a vServer. These being:-
- Use the ZFS storage capabilities to backup and restore the entire disk images.
- Use a backup mechanism, such as rsync, to copy data from the root disks of the vServer to a backup storage device.
- Template the existing vServer on a regular basis and use this template to create a new vServer to restore.
Backup using ZFS appliance to backup full disks
This
approach essentially makes use of the ZFS appliance to create a backup of the
entirety of the ExalogicRepo share and taking a copy of the full disk
images. The restore is then done via a process of recovering the root
disks and any additional volumes for a vServer and replacing the existing
images. As a process it is fairly simple to implement but has some
limitations, for example it does not enable the migration from one rack
to another, or even the moving to a different physical host within a
rack is involved. Similarly restoring individual files or filesystems
would mandate starting up the backup copying the files off, shutting it
down and reverting to the original and copying the file in.
To
be certain of not having a corrupted backup it would also be necessary
to ensure that the vServer being backed up is not running at the time
that the backup/snapshot is taken.
Backup using backup technology from the vServer - rsync
Introduction
This
approach makes use of a backup capability within the Linux environment
of the vServer itself. Very much a "standard" approach in the
historical physical world where a backup agent is installed into an
operating system, this agent backups all the files to a media server.
There are many products that provide these services from all the main
backup vendors. In this example we will consider using the linux
command rsync to provide the capability to backup to the ZFS appliance.
Backup using rsync & ZFS Appliance snapshot capability
The
backup process incorporates configuring both the ZFS appliance and the
vServer that is being backed up. The process to follow is
- Create backup share and configure it to regularly snapshot
- Mount backup share on vServer (Using NFS v3)
- Issue the rsync command to backup full server on a regular basis. (cron)
Create Backup share
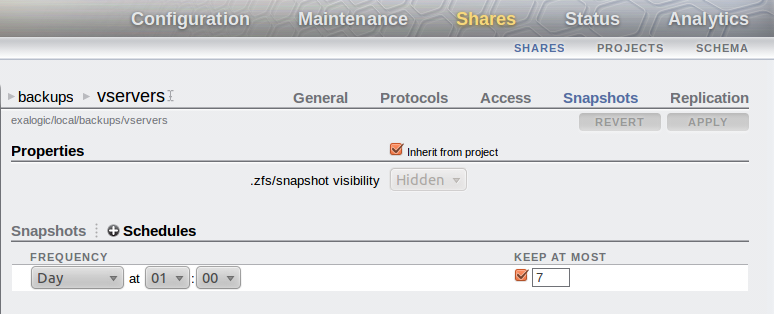
The
first activity is to create a project/share to hold the backups of the
vServers. Once the filesystem has been created then ensure that you
setup the system to automatically create regular snapshots of the share.
In the graphic below the share has been setup to snapshot the system
daily at 1am and to keep 1 week's worth of snapshots on the storage
appliance.
You
should also setup replication to push the backups to a remote location
for safekeeping. This is a simple activity of setting up a replication
target under the Configuration/Services/Remote Replication tab then for
the share (or at a project level) define the replication settings.
Make sure the share has root squash enabled. (root access in an NFS exception)
Mount the share on the vServer
It
is now possible to mount the share on the vServer. This can be done
dynamically at the point in time when the backup is performed or via a
permanently mounted share.
It is necessary to mount the share using NFS
v3. This is because there are a number of specialist users that will
be setup on the vServer with ownership of certain filesystems. (eg. the
ldap user) Because NFS v4 has a user based security check then these
files may fail to backup successfully so NFS v3 is a better bet.
If using a permanent mount point defined in /etc/fstab then there should be a line similar to that shown below.
...
<IP/Host
of storage appliance>:/export/backups/vservers /u02/backups nfs
rw,bg,hard,nointr,rsize=131072,wsize=131072,tcp,vers=3 0 0
...
|
However general advise would be to mount the share
specifically for the backup then umount it so that under normal
usage of the vServer the backup is not visible to users of the system.
This is the mechanism that the linked
script uses.
On
an Exalogic the initial backup of a simple vServer that has nothing but
a deployment of WebLogic took just over 6 minutes for the first backup.
Subsequent backups make use of the intelligence built into rsync to
only copy changes to the backup version, thus following copies were
completed in ~30 seconds. Obviously if there had been a lot of changes
to the files then this number would increase towards the original 6
minutes.
vServer configuration for backing up
rsync
is a fairly simple command to use, however the setup required to ensure
it is configured to copy the correct files to an appropriate remote
location is more complex. The basic command to use is shown below with
the restore being a reversal of the command.
# rsync -avr --delete --delete-excluded --exclude-from=<List of files to exclude> <Backup from> <backup to>
|
However to simplify the setup I have created a short
script that makes use of the Exalogic ZFS appliance and excludes files
appropriate for the Oracle Linux base image. The script I used can be
found
here and its usage is shown below
donald@esat-df-001 :~/consulting/oracle/exalogic/bin/backup/rsync$ ./rsync_backup-v1.0.sh -help
rsync_otd_backup.sh
-action=(backup|restore) : [backup]
-nfs_server=<IP of NFS storage device> : [nfs-server]
-nfs_share_dir=<Directory of NFS share> : [/export/backups/vservers]
-mount_point=<Directory of mount point on local machine> : [/mnt/backups]
-backup_dir=<root directory for backups under the mount point> : [esat-df-001]
-directory_to_backup=<Source directory for backing up.> : [/]
-automount
-script
If automount is not specified the system will assume that the mount point defined already exists
-script is used to indicate that the script is run automatically and should not prompt the user
for any input.
|
Each parameter can be defined from
the command line to determine the configuration, however if called
automatically (from cron for example) you must include the -script
option, otherwise it will prompt for confirmation that the
configuration is correct. The defaults are all setup within the script
itself, inside the setup_default_values function at the top, these should be changed to suit your environment. Similarly the function create_exclusion_list
contains a list of files/directories that will not be
backedup/restored. Primarily because these directories are specific to
devices attaches, temporary or cache files. The list here is what I
have found works using Oracle Linux 5.6 but will need to be reviewed for
your environment.
To perform the backup the
simplest approach is to setup cron to run the job. I was using a backup
run hourly, with the ZFS appliance keeping a copy on a daily basis but
the specific needs for backup frequency will vary from environment to
environment. An example of the crontab file used is shown below.
[root@esat-df-001 ~]# crontab -l
10
* * * * ./rsync_backup.sh -action=backup -script
-nfs_server=172.17.0.17 -nfs_share_dir=/export/backups/vservers
-mount_point=/mnt/backups -backup_dir=esat-df-001 -directory_to_backup=/
[root@esat-df-001 ~]#
|
Restore using rsync
The
restore process is approximately a reverse of the backup process
however there are various options that make this approach flexible.
These being:-
- The ability to restore individual files or filesystems to the vServer
- A complete restore from backup of vServer
- The recreation of a vServer on another host/rack, restoring to the values defined in the backup.
These
options can all be fulfilled by the use of rsync with varying degrees
of manual intervention or different restore commands.
Recreating a vServer and restoring from backup
Should
a vServer become corrupt or deleted (deliberately or accidentally) then
it may be necessary to recreate the vServer from a backup. Assuming
that the vServer is to have at least its public IP address identical to
the previous server then the first activity is to allocate the same IP
address to the new vServer that is will be created. This is done by
simply allocating the IP address and then during the vServer creation
process defining the network to have a static IP address.
Ensure
that the vServer you create has a similar disk partitioning structure
to the original. Perfectly OK for the partitioning to be done
differently but it will be necessary to make changes to the backed up
/etc/fstab file to match the new vServer layout and to perform the file
system creation and same mount points.
Thus the activities to perform/consider on creation are:-
- Ensure the disk size/additional volumes are created as needed.
- Allocate
IP address for any IPs that are to be recreated in the new vServer.
Statically assign them to the vServer during creation.
- After first boot
- Format and mount volumes/additional disk space as needed.
- For
all the NFS mounts that were on the previous vServer re-create the
mount points. (All defined in the backup copy of /etc/fstab)
- Ensure disk partitions/volumes are mounted such that the vServer has similar storage facilities to the original.
- Restore from backup.
- Edit files to correct for new environment
- Edit /etc/hosts to make changes as necessary to any IP addresses appropriate to new vServer/environment
- Check the /etc/fstab file to correct according to new partitioning/volumes attached if changed from original
- Reboot & test
Point 4 is where the rsync command is run to create a backup, if you are wanting to backup to one of the earlier snapshots then make sure that you use the ZFS appliance to create a new share from one of the snapshots and then use that share to mount the backup and copy the files onto the new vServer.
Backup by Templating an existing vServer (A later blog post....)