Showing posts with label Weblogic 12c. Show all posts

Friday, 31 October 2014

Disaster Recovery of WLS Applications on Exalogic

Introduction

For many years Oracle Fusion Middleware based on WebLogic server has been capable of being used to provide high availability, fault tolerance and disaster recovery capabilities.  This has been documented as part of the Maximum Availability Architecture whitepapers. Follow this link for all the MAA documentation or follow this link to go directly to the Fusion Middleware Disaster Recovery architecture documentation.

Exalogic/Exadata provides an ideal platform on which these architecture can be realised with all the advantages that come with using Oracle Engineered systems.

This blog posting gives a very high level overview of the principles used in implementing active/passive DR for a fusion middleware application.  Much of the activity involved from an application perspective is identical irrespective of the deployment being on physical or virtual hardware.  In this article we will have a slightly deeper dive on how the Exalogic ZFS storage appliance is used to enable the DR solution.

Basic principles involved in setting up FMW DR

The basic tenet of deploying an application is to follow a set of rules during the deployment/configuration of the application which will make it simple to start the application up on the DR site.  The setup should be:
  1. Deploy all tiers of the application ensuring:-
    1. In the primary environment a set of hostname aliases are used for all configuration, these aliases not linked to the specific host and all configuration in the products specify these names rather than actual IP addresses.
    2. The binary files and application configuration  (normally the domain homes) are all located as shares on the ZFS appliance and mounted via NFS to the Exalogic vServers.
    3. Critical application data that must be persisted goes into the Database.  Specifically thinking of the WebLogic Transaction logs and the JMS messages.  (We will use the Oracle Data Guard product to ensure critical data is synchronously copied to the remote site)
    4. Keep the configuration in the Operating System to an absolutely minimum possible.  Probably no more than /etc/hosts entries and if needed specific service startup commands.  Other OS configuration should be built into the templates used to create the environment in the first place.
  2. Create mirror vServers on the DR site.
    1. These vServers will be used to host the production environment when DR has occurred.  The same minimal OS configuration should be present in this site.  To save time in DR the servers can be started up or they can be started on-demand at DR startup.  If already running then ensure that the application services are all shutdown.  The hosts files must have the same hostname aliases in it that the primary site has but obviously they will be resolving to different IP addresses.
  3. Create a replication agreement for all the shares that host the application binaries and domains.
  4. When DR is to happen   (ignoring DB)
    1. Break the replication agreement
    2. Export the replicated shares so that they can be mounted.
    3. Mount the replicated shares in exactly the same location on the DR vServers
    4. Startup the application on the DR environment
    5. Test and if OK then redirect traffic at the front end into the DR service.
Obviously this is somewhat simplified from most real world situations where you have to cope with managing other external resources, lifecycle management and patching etc.  However the approach is valid and can be worked into the operations run book and change management processes.

All these steps can be automated and put into the control of Enterprise Manager such that the element of human error can be removed from the equation during a disaster recovery activity.

Using the ZFS Storage Appliance for Replication

From the application perspective a key function lies with the NAS storage which has to be able to copy an application from one site to another.  The ZFS Storage appliance within an Exalogic is a fantastic product that provides exactly this functionality.  It is simple to set it up to copy the shares between sites.

Setup a Replication Network between sites

The first activity required when wishing to perform DR between two sites is to create a replication network between the ZFS appliance in both Exalogic racks.  This can be done using the existing 1GbE management network that already exists, however this is not recommended as this network is not fault tolerant, there being only one 1GbE switch in the rack.  However on the ZFS appliance there are two 1/10GbE network connections available on the back of each storage head (NET2 & NET3).  By default one connection goes into the 1GbE switch and the other is a dangling cable, thus two independent routes into the data centre are available.  If a longer wire is required to connect then it is possible to disconnect the existing ones and put in new cables.  (Recommendation - Get Oracle Field Engineers to do this, it is a tight squeeze getting into the ports and the engineers are experts at doing this!)

Once each head is connected via multiple routes to the datacenter and hence on to the remote Exalogic rack then you can use link aggregation to combine the ports on each head and then assign an IP address which can float from head to head so it is always on the active head and hence has access to the data in the disk array. 

Replicating the shares

Having setup the network such that the two storage appliances can access each other we now go through the process of enabling replication. This is a simple case of setting up the replication service and then configuring replication on each project/share that you want coped over.  Initialy setup the remote target where data will be copied to.  This is done via the BUI, selecting Configuration, and then the Remote Replication.  Click on the + symbol beside "Targets" to add the details (IP address and root password) of the remote ZFS appliance.

Adding a replication target
Once the target has been created we now setup the project/share to be replicated.  Generally speaking I would expect a project to be replicated which means that all the shares that are part of the project will be replicated, however it is possible to replicate at the share level only for a finer granularity.
To setup replication using the BUI simply click on the Shares and either pick a share or click on the Projects and edit the project level.  There is then a replication sub-tab and you can click on the "+" symbol to add a new "Action" to replicate. 
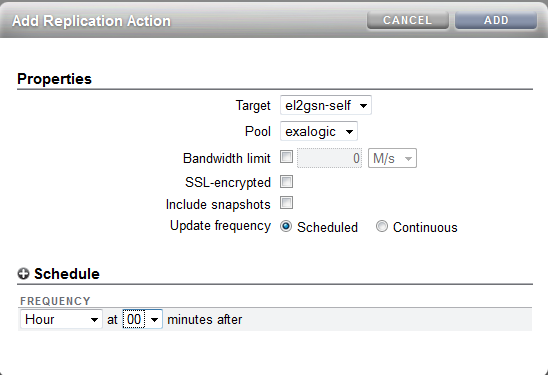
Replication of a project
Simply pick the Target that you setup earlier in the Remote Replication agreement, pick the pool - which will always be exalogic - and define the frequency.  Scheduled can be down to every half hour or Continuous means that it will start a new replication cycle as soon as the previous one completes.  There are a couple of other options to consider, Bandwidth limit so that you can prevent replication swamping a network, "SSL encryption" if the network between the two sites is considered insecure and "Include Snapshots" which will copy over the snapshots to the remote site. 

Obviously the latter two options have an impact on the quantity of data copied and the performance is worse if all data has to be travelling encrypted.  However, after the initial replication only changed blocks will be copied across and given that the shares are used primarily for binaries and configuration data there will not be a huge quantity flowing between the sites.

Process to mount the replica copies

Having completed the previous steps we have the binaries and configuration all held at the primary site and a copy on the remote site.  (Although bear in mind that the remote copy may be slightly out of date!  It is NOT synchronous replication.)  For DR we now assume that the primary site has been hit by a gas explosion or slightly less dramatic we are shutting down the primary site for maintenance so want to move all services to the DR environment.  The first thing to do is to stop the replication from the primary site.  If the DR environment is still running then this is as simple as disabling the replication agreement.  Obviously if there is no access to the primary then one must assume that replication has stopped.


Then on the DR site we want to make the replicated shares available to the vServers.  This is acheived by "exporting" the project/share.  To navigate to the replica share simply select the Shares and then the Projects listing or Shares listing appropriately.  Under the "Projects" or "Filesystems : LUNs" title you can click to see the Local or Replica filesystems.  By default the local are shown so click on Replica to see the data coped from a remote ZFS appliance.

Replicated Projects
We can then edit this project as you would for a local project.

Under the General tab there is the option to "Export", simply select this check box and hit apply and the share will be available to mount by the clients.  By default the same mount point that was on the primary site will be used on the DR site.

Health Warning : When you export a project/share then all shares with the same directory mount point are re-mounted on the client systems.  Make sure every project has a unique mount point.  If left at the default of /export then the Exalogic Control shares are also re-mounted which has the impact of rebooting compute nodes.  

Export checkbox to enable share to be mounted

Once the shares have been exported then the DR vServers can mount the shares, start the application services up and be ready to pick up from the primary site.  Finally, create the replication agreement to push data from the DR site back the primary until the failback happens to the primary site.

All the steps for DR once the environment has been correctly setup only take in the order of seconds to complete so the outage for the DR switchover can be taken down to seconds for the technical implementation aspects.


Friday, 13 June 2014

Example of Application Version Management Using OTD

When using Exalogic to host an application it is fairly common to see Oracle Traffic Director (OTD) being used as a load balancer in front of the application.  OTD has a rich functional set that can make it more than just a load balancer/proxy - this allows it to perform traffic management/shaping.  In a recent engagement I was asked if it could perform application version management, to which the answer is yes.

The solution presented here is just one possible answer to application versioning and there are often many other approaches that should be considered.

Problem Statement

The scenario we are looking at here is a situation where a new JEE application is being deployed to an application server and the new version is to be set live on a particular date/time.  Existing sessions with the old application are to carry on using the previous version of the application until their sessions expire.
There are a number of restrictions that apply:-
  • No changes to the underlying application.  (For example, WLS has the concept of versioning built into it but the application code - descriptors - must be altered to use this.  In our scenario we are using a third party application and do not have the ability to make any changes.)
  • No application down time is allowed.  (App is accessed 24*7)
  • Existing sessions remain on the previous version and new sessions use the new version

Solution Overview

The solution used makes use of the routing rules that are available in OTD.  Essentially inspecting the HTTP requests that hit OTD and determine if the request should remain on the old application version or be routed to the new version.

The first problem is to figure out how to know if a request is to be routed to the old or new version of the application.  Assuming the back end application is an application server it is very likely that a jsessionid cookie will be set for any existing client connection.  If not set then we could route what will be a new session onto the new application version.  The problem comes with the next request, it will have the jsessionid cookie set and we have no way of knowing if the session is to be routed to the old or the new application version.  A solution to this issue is to use OTD to inject an additional cookie into the browser, this cookie can contain the time that it was created.  Then we can simply inspect this cookie on each request and if the time it holds is before a cut-off date then route to the old version and if after the cut off then route to the new application.

Solution Detail

Injecting a Cookie

The first activity is to use OTD to inject a cookie into the HTTP response that goes back to the client.  This can be done using the Server Application Functions (SAFs) that OTD supports, these are documented in this link.  (Although check for newer documentation releases from here.)

In summary OTD makes use of a special file the obj.conf file that contains a list of directives to instruct OTD how to handle incoming HTTP requests.  Many of the changes done through the OTD administration console or command line end up as directives in this file.  In addition to the commands that are neatly wrapped up in the console interfaces there are additional directives and functions that can be added by editing the correct obj.conf file by hand.  Inserting a cookie is one such SAF.

The first activity is to understand which file to edit.  If you simply do a search from the command line under the OTD instances directory for all *.obj.conf files you will see that there are multiple copies of files held.  This is because each configuration/virtual server has its own copy of the file and these are held centrally in a repository and copied out to the running instances when changes are deployed.  In our scenario we are wanting to change the HTTP processing for a particular "Virtual Server" as part of an OTD configuration.  The path to the file we are interested in is:-


<OTD Instance Home>/admin-server/config-store/<configuration name>/config/<virtual 
server name>-obj.conf


This resides on the server that is hosting the OTD administration server which manages all the obj.conf files for all the configurations/virtual servers used.  The <virt-server>-obj.conf file is the copy held in the repository, it can be edited to add a section that will inject the cookie.  Having edited the file then either use the command line (tadm) or the browser to deploy the configuration file.  The action of deploying the config file will copy the configuration to the running instances and update them so that they use the new configuration.  This update is done dynamically and does not require any downtime of the OTD instance.

A sample directive to add the cookie is shown below:-


<Object name="default">
AuthTrans fn="match-browser" browser="*MSIE*" ssl-unclean-shutdown="true"
NameTrans fn="assign-name" id="default-route" name="default-route"
NameTrans fn="map" from="/" to="/"
<If not defined $cookie{"MyApp"}>
ObjectType fn="set-cookie" name="MyApp" value="$time"
</If>

Service fn="proxy-retrieve" method="*"
AddLog fn="flex-log"
</Object>

<Object name="default-route">
...


So in this case if the cookie has not been presented to OTD by the client browser then OTD will add a cookie called "MyApp" with a value of the current time.  (In seconds since the epoch).  The client will then present this cookie in all subsequent requests.  It is possible to set additional options such as the domain and path which can specify when the client will send the cookie or to set a max-age parameter which will make the cookie persistent with the browser and last for the duration specified, in seconds.  In our example the max-age is not set so the cookie will last for the duration of the session.  (until the browser is shutdown)

Handy Hint
With unix it is fairly easy to get the current time in seconds since the epoch using the # date +%s command which will simply format the current date.  Or to convert from a number of seconds to a meaningful date use # date -d @1402655677

Setting up a Routing Rule

Having added the cookie we now have something that we can easily use to route with.  This can be done either by editing the obj.conf file directly or using the browser interface which provides some help in ensuring that the syntax is correct.   To add/edit routing rules simple ensure that you have selected the configuration you want to manage and then open up the virtual server in the navigation pane and it is possible to then add the routing rules.

In our scenario we are going to add a routing rule that will inspect the "MyApp" cookie and if the value is greater than a set time then route the request to the next version of the application.  This could be as simple as routing to a different origin server pool if the new application has been setup in an entirely different set of WLS instances, or as in this case the rule will cause a re-write of the request to access a different URL where the two applications (new and old) are both held in the same application server but with different base URLs. 

Routing rules to direct requests to the new app version


These rules can then be deployed to the server instances which again is done dynamically with no down time.  Then when the clients access the service if not present they will have the "MyApp" cookie added to their browser and each request is then checked against the cookie value and if the value is greater than the time specified in the rule then the request will be routed to the second version of the application.  Sessions that started on before the cutoff time will continue to use the previous version of the application using the default rules.  (or other routing rules.)

The changes to the routing rules are reflected in the obj.conf file as shown below.


#
# Copyright (c) 2014, Oracle and/or its affiliates. All rights reserved.
#

# You can edit this file, but comments and formatting changes
# might be lost when you use the administration GUI or CLI.

<Object name="default">
AuthTrans fn="match-browser" browser="*MSIE*" ssl-unclean-shutdown="true"
<If defined $cookie{"MyApp"} and $cookie{"MyApp"} gt "1402483929">
NameTrans fn="assign-name" id="myapp-v2" name="myapp-v2"
</If>

NameTrans fn="assign-name" id="default-route" name="default-route"
NameTrans fn="map" from="/" to="/"
<If not defined $cookie{"
MyApp"}>
ObjectType fn="set-cookie" name="
MyApp" value="$time"
</If>
Service fn="proxy-retrieve" method="*"
AddLog fn="flex-log"
</Object>

<Object name="default-route">
Route fn="set-origin-server" origin-server-pool="origin-server-pool-1"
</Object>

<Object name="myapp-v2">
NameTrans fn="map" to="/MyApp-v2" from="/MyApp"
Route fn="set-origin-server" origin-server-pool="origin-server-pool-1"
</Object>


Obviously once the previous application version has been fully retired then the default rule can be used to direct to the new version and this routing rule deleted.  Potentially the cookie injection can also be removed.

Conclusion

With a very simple configuration consisting of a single cookie injection and a routing rule it is possible to use Traffic Director to manage different application versions. 

Tuesday, 11 February 2014

Websocket support in Oracle Traffic Director

Introduction

In recent releases the Websockets function has been added as a capability to both WebLogic 12.1.2 and Oracle Traffic Director (11.1.1.7.0).  This blog posting is another courtesy of my colleague Mark Mundy who has been doing some investigation into what is involved to setup an architecture with a browser accessing a web application running websockets on WebLogic and proxied/load balanced through OTD.

The WebLogic documentation covers the setup of Websockets at the server side and the OTD documentation explains what is needed for the load balancer.  This blog posting is intended to show how the two can be used together on the latest Exalogic virtualised release to have OTD load balance a simple example websocket application with relative ease. This posting will not go through every aspect of the setup as the assumption is that the reader has some familiarity with Exalogic Control, WebLogic and OTD.  The example application being used is the one that ships as part of the example set for WebLogic 12.1.2 with a slight modification as will be highlighted.
The deployment topology that is used in this scenario is shown below.
WebSocket deployment Topology - Browser --> OTD Load Balancer --> Application(WLS Cluster)

Setting up the Exalogic Environment 

Depending on how complex you want to make the environment, will determine what needs to be set up. In order to demonstrate the basic load balancing while ensuring that there is no direct network connectivity between the client browser and the back end WLS managed server hosting the websocket application, a minimum of 2 vServers would be needed. In order to test out features such as load balancing during failure scenarios at both WLS and OTD ideally 5 would be created. For this example it will be assuming 5 vServers are created and the topology reflected in the following diagram shows the networking setup.
 
Exalogic vServer deployment topology

WebLogic Installation and Configuration

WebLogic 12.1.2 is the minimum version that can be used for Websocket support, select the 12c Generic Download from the Oracle download site.  (This will have a dependency on the latest 64bit java version so if not already installed on your vServers then install prior to installing WLS.)
Install the Complete Installation of WLS 12.1.2 using the installed 64 bit Java 7.  Installing the complete installation will ensure the example applications are available and it is the Websockets example that will be used.  Once WLS is installed complete the post installation configuration to ensure this happens. For more details on getting the examples available see this link
The specific websockets example application used in this document will be introduced after a specific WLS domain is created to host it.
Rather than use the WLS examples domain a new domain will be used so as to keep things as simple as possible but at the same time allowing the ability to have more flexibility in the testing. Further detail about the WLS implementation is available in the documentation.

A new WLS domain needs to be created using the domain wizard.  In the topology shown above the two instances in a cluster that listen on the private vNet and the administration server uses this network as the default but also has an additional HTTP channel setup to listen on the EoIB public network so that administration becomes simple from outside the Exalogic rack.  The websocket application can then be deployed to the cluster such that is is only accessible to the client population through the OTD tier, providing a level of security.

The example that ships with WebLogic will only work in the scenario where the browser and WLS managed server are both on the same host. To resolve this issue we make a small change to the code in the example before building the application and deploying to the cluster.  In the example source code identify exampleScript.js and change the line that opens up the websocket.
This Javascript file is normally located in:-
<WLS_Home>/user_projects/applications/wl_server/examples/src/examples/webapp/html5/webSocket/src/main/webapp/script
Use your editor of choice and search for "localhost:7001" and replace it with " + window.location.host +" as shown below.

...
if (ws == null) {
      ws = new WebSocket("ws://localhost:7001/webSocket/ws");
      ws.onopen = function() {
        addMsg("Server Msg: WebSocket has been started.");
      };

...
becomes
...
if (ws == null) {
      //ws = new WebSocket("ws://localhost:7001/webSocket/ws");
      ws = new WebSocket('ws://' + window.location.host + '/webSocket/ws');

      ws.onopen = function() {
        addMsg("Server Msg: WebSocket has been started.");
      };

...

The directory <WLS_Home>/user_projects/applications/wl_server/examples/src/examples/webapp/html5/webSocket contains full instructions on building and deploying the application.  In our case we only need to re-build the application (ant build) and then use the standard WLS admin console (or WLST or ant if you prefer) to deploy the war file created to the WebLogic Cluster.

Oracle Traffic Director Installation and Configuration

For Websocket support we need to ensure that we install OTD 11.1.1.7.0 or higher.  In our scenario we will install OTD onto the admin vServer and the two OTD instance vServers to end up with an HA cluster hosted on the two instance vServers that will route requests through to the backend WLS cluster.  It is useful to enable monitoring on OTD so that we can easily spot the sessions being created in OTD and through to the back end WLS instances.  To enable monitoring highlight the virtual server and enable the plain text report.  As shown below.

Enable plain text monitoring in OTD

Websocket support is enabled by default in OTD so there is nothing else other than the deployment of the configuration to the cluster before we test out our Websocket application.  However for information if there is a desire to disable websockets for a particular route then this can be achieved via the enable/disable of the "WebSocket Upgrade" for a given route.


Enable/Disable Websocket support in OTD.

With the monitoring in place it is then possible to access the plain text report by accessing the URI http://OTD IP address:port/.perf where the Origin Server statistics are of particular interest.  As highlighted below.


Testing the application

In another browser session/tab it is then possible to access the OTD instance with the URN /websocket.  You can then click the start button to open up the socket and enter text to send to the server.  Currently you should use either Chrome or Firefox but not Internet Explorer as it does not support websockets.


WLS WebSocket example application

By starting up additional browser sessions you can create multiple websockets and the .perf output will reflect the load balancing to the back end WLS instances.


In this example we can see that 3 websocket sessions have been created and they have been load balanced round the two available WLS server instances.

Behind the scenes what is actually happening is that there are two socket connections created for each WebSocket.  The first is between the client browser and the OTD instance and the second from OTD to the WLS instances.  OTD acts to bridge the gaps between the two.  Below is the output from netstat on the OTD instance to show these socket connections.

Browser to OTD instance.
# netstat -an
Active Connections
Proto  Local Address          Foreign Address        State
TCP    138.3.32.68:52732      138.3.49.9:8080        ESTABLISHED


& OTD to WLS
# netstat -an | grep 7003
tcp        0      0 192.168.16.74:39223         192.168.16.71:7003          ESTABLISHED


The nature of establishing multiple sockets to link the load balancer to the back end service means that in the event of a failure by either OTD or WLS then the socket connection will be broken and the client must re-establish the socket again.  Thus for HA connections there is a dependency on the client capturing any exceptions and re-establishing the connection.
Note:- If OTD is setup with a failover group (HA config) then one instance is primary and the second acts as a backup.  Should the primary fail then the websocket would have to be re-established using the backup OTD instance.  Once the primary is available again OTD will automatically fail back which will again break the websocket connection.