Hi All,
I have no intention of dropping the blog entirely however my job role has evolved slightly to move away from Oracle Engineered Systems and the Exalogic to cover the new Oracle Cloud Machine. Obvously with a title like exablurb there is a hint that I will be covering Exa* machines, the Cloud Machine or OCM does not really fit into that category. For those interested I will be putting new posts up on http://ablether.blogspot.co.uk/ and I have copied all the posts from exablurb over to this new name so all content is still there and if anyone spots any errors in the historical blogs I will update in the ablether blog rather than in exablurb.
Cheers
Don
Thursday, 2 June 2016
Wednesday, 25 November 2015
Networks that span multiple Engineered Systems/Exalogic Accounts
This blog post is to introduce some functionality that has fairly recently (~Oct 2015) become available that allows additional infiniband shared networks to be defined. This enables internal networks to span accounts or be extended to other Engineered Systems.
Historically an Exalogic rack is setup with two internal (IPoIB) networks that have IP addresses which can be handed out to vServers in all accounts, these are the vServer Shared Storage and the IPoIB Default networks. Any vServers on the storage network are limited members and full members of the infiniband default network. It is possible to override the membership of a virtual machine to allow vServers to communicate to each other internally on the Infiniband storage net.
Security concerns about using the IPoIB default network to allow inter-vServer communication alongside access to the database tier has meant that this network tends not to be used to allow cross-account conversations. The only other mechanism to allow network traffic between accounts was to use a public EoIB network which has the downside of preventing the Infiniband high performance protocols and mandating the smaller MTU sizes and thus is sub-optimal for performance based applications.
Recent changes in Exadata have introduced support for the use of non-default partitions. Indeed, when Exadata is setup to make use of the database running in a virtual machine the normal configuration will be such that there is no use of the IPoIB_default partition (0x7fff). This was a problem for Exalogic which historically only had access to Exadata over the IPoIB-default network.
The standard configuration of a virtualised Exadata is to have two IB partitions, one that allows the database server to talk to the storage servers and another that will connect the virtual machine to another virtual machine on the Exadata so that a distributed RAC cluster can be setup and use IB for inter-cluster communications. Obviously if Exalogic wants to communicate to Exadata using the Infiniband Optimised protocols the Exalogic must be able to link in with the Exadata over a non-default infiniband partition. This is depicted in figure 1 below.
This example shows a two tier application deployed to Exalogic, the web tier which has access to the EoIB client network, potentially hosting an application like Oracle Traffic Director. This can forward requests on to an application tier over an internal private network and then the application tier is linked to another IPoIB internal network but this is what might be considered a "public private network" meaning that this network can be handed out to vServers and provide linkage to the Exadata virtual machines which have had this specific network (partition) allocated to them. The Exadata also has two other internal IB networks, one to allow the RAC cluster to communicate between the DB servers and another to allow access to the storage cells.
The approach to creating this non-default network that spans both Exalogic and Exadata introduces a couple of potential options. Firstly to extend a private network from an Exalogic account into the Exadata rack and secondly to create a new Exalogic customer shared IPoIB network which can span multiple Exalogic accounts.
This example is is for the connected Exadata that we discussed earlier. In this case the process to follow is:-
Historically an Exalogic rack is setup with two internal (IPoIB) networks that have IP addresses which can be handed out to vServers in all accounts, these are the vServer Shared Storage and the IPoIB Default networks. Any vServers on the storage network are limited members and full members of the infiniband default network. It is possible to override the membership of a virtual machine to allow vServers to communicate to each other internally on the Infiniband storage net.
Security concerns about using the IPoIB default network to allow inter-vServer communication alongside access to the database tier has meant that this network tends not to be used to allow cross-account conversations. The only other mechanism to allow network traffic between accounts was to use a public EoIB network which has the downside of preventing the Infiniband high performance protocols and mandating the smaller MTU sizes and thus is sub-optimal for performance based applications.
Recent changes in Exadata have introduced support for the use of non-default partitions. Indeed, when Exadata is setup to make use of the database running in a virtual machine the normal configuration will be such that there is no use of the IPoIB_default partition (0x7fff). This was a problem for Exalogic which historically only had access to Exadata over the IPoIB-default network.
The standard configuration of a virtualised Exadata is to have two IB partitions, one that allows the database server to talk to the storage servers and another that will connect the virtual machine to another virtual machine on the Exadata so that a distributed RAC cluster can be setup and use IB for inter-cluster communications. Obviously if Exalogic wants to communicate to Exadata using the Infiniband Optimised protocols the Exalogic must be able to link in with the Exadata over a non-default infiniband partition. This is depicted in figure 1 below.
 |
| Figure 1 - Connecting EL and ED using non-default Infiniband Network |
This example shows a two tier application deployed to Exalogic, the web tier which has access to the EoIB client network, potentially hosting an application like Oracle Traffic Director. This can forward requests on to an application tier over an internal private network and then the application tier is linked to another IPoIB internal network but this is what might be considered a "public private network" meaning that this network can be handed out to vServers and provide linkage to the Exadata virtual machines which have had this specific network (partition) allocated to them. The Exadata also has two other internal IB networks, one to allow the RAC cluster to communicate between the DB servers and another to allow access to the storage cells.
The approach to creating this non-default network that spans both Exalogic and Exadata introduces a couple of potential options. Firstly to extend a private network from an Exalogic account into the Exadata rack and secondly to create a new Exalogic customer shared IPoIB network which can span multiple Exalogic accounts.
Extending a Private Network
In this scenario we create a private network within an Exalogic account and then expand the Infiniband partition into the Exadata. This means that access to the Exadata is kept purely within an Exalogic account. The steps to go through are:- Create a private network in an Exalogic Account
- Edit the network to reserve the IP addresses in the subnet that the Exadata will use.
- Identify the pkey value that this new network has been assigned
- Using the IB command line/Subnet Manager make the new partition extend to the Exadata switches and database servers.
- Recreate the Exadata virtual machines adding the new partition key to the virtual machine configuration file used.
- Configure the Exadata VM to use an IP address made unavailable to the Exalogic
Creating a new "Custom Shared IPoIB Network"
This is a slightly more flexible approach than the first scenario as we create a new "public private" network and then allocate IP addresses on this network to each account that will need access to it. This is also useful in the use cases that Exadata is not involved because it allows certain virtual machines to be setup as a service provider and others as service consumers. A provider being an IB full member of the partition and a consumer a limited member. Thus all consumers can access and use the service provider functions but the consumers cannot "see" each other.This example is is for the connected Exadata that we discussed earlier. In this case the process to follow is:-
- Run the process to create the new IPoIB network. It can be setup such that all vServers will be limited or full members by default, defines the IB Partition and specifies the subnet used as well as which IP addresses the Exalogic rack will use.
- Allocated a number of IP addresses from this new network to each account that will use it. Same process that is used for EoIB networks, storage network or the IPoIB Default network today.
- Create vServers in the accounts with an IP address on the custom shared network.
- Identify the pkey for the custom network and extend the partition to the Exadata switches and DB server nodes. The primary difference here is that if the Exadata was setup first then the first step in this process would have been to specify the pKey that was originally used by the Exadata. (i.e. Either the Exadata or the Exalogic can be the first to specify the pKey.)
- Warning - The pKey being used is defined manually. Make sure it will not overlap with any pKeys that Exalogic Control will assign.
- Recreate the database virtual machines assigning the pkey to their configuration and within the VM specify the IP address you want them to use.
- Test
Tuesday, 7 July 2015
Oracle Traffic Director - Deployment options, Virtual Servers vs Configurations
Summary
Oracle Traffic Director (OTD) is a powerful software load balancing solution. As with most good products there is a degree of flexibilty in how it can be deployed with different approaches allowing the solution to be formed. This article discusses two options that could be used to determine different routing possiblilties.The scenario that is being considered is a need to perform two separate load balancing activities in the same OTD environment. For example, load balancing to an older SOA 11g deployment and to SOA 12c for recent integration deployments. Another possible example would be two routes to the same back end service but one is designed for high priority traffic while the other route will throttle the service at a preset load. The two options that are discussed are:
- Using two separate configurations, one for SOA 11g and one for SOA12c.
- Using one configuration that has two virtual servers. The virtual servers handling the routing for each environment.
OTD Configuration Overview
Simple configuration
An OTD deployment, in its simplest form, consists of an administrative instance which manages the configuration and a deployed instance. The deployed configuration specifies the HTTP(S)/TCP listening port, routing rules to one or more origin servers, logging setup etc. In many situations there is a business need to use OTD to manage requests to different business applications or even just to different environments/versions of an application. It is obviously possible to split these out by using independent deployments of OTD however to minimise the resources required and keep the number of deployed components to a minimum there are options to use one administration server. |
| The base configuration options |
The minimum configuration that will appear for a configuration is a setup which defines things like the listening ports, SSL certificates, logging setup and critically at least one origin server pool and a virtual server. The origin server pool is a simple enough concept in that it defines the back end services to actually fulfil the client requests.
Using Virtual Servers
The virtual servers provide a mechanism to isolate traffic sent to the software load balancer. Each virtual server contains its own set of routing rules which can determine the origin servers to send requests to, caching rules, traffic shaping and overrides for logging and the layer 7 firewall rules. The virtual server to be used for subsequent processing is identified by either the listening port or the hostname used to send the request. |
| Virtual Server example - Routing based on otrade-host |
 |
| Virtual Server example - Routing based on websession-host |
There is always at least one virtual server. By default this is created and the hosts field left blank such that it is used if any traffic hits the listening port.
Solution Variations
Multiple Configurations
Overview
In this setup two configurations can be defined and deployed. It is quite possible to have both configurations deployed to the same OS instances. (Admin node in OTD talk.) The result of deploying the configuration to the admin nodes is the creation of another running instance of OTD. |
| Running multiple configurations |
Advantages
- Each configuration is managed independently of each other. (within the one administration server)
- The settings are independent of each other.
- The running instances for each configuration are independent of each other. i.e. Can be stopped and started without impacting the other configuration instances running.
- Simple to understand
Disadvantages
- Care must be taken to ensure that the configurations do not have clashes with each other. (eg. Same listenting ports)
- Results in more processes running on each OS instance.
Multiple Virtual Servers
Overview
In this situation there is one configuration with multiple virtual servers which result in different routing rules being applied to send requests on. In the diagram below we have deployed a single configuration to two OS instances with the configuration containing two virtual servers. As per the multi-config option I have shown two OS instances to indicate that the failover group can be used for HA. |
| OTD Using Two Virtual Servers |
Advantages
- One configuration that provides visibility of all configuration in the environment.
- Minimal running processes
- Simplifying the monitoring
- Reducing resources required to run the system
Disadvantages
- Introduces dependencies between the environments
- eg. Can share listeners, origin server pools, logging config etc. Thus one change can impact all instances
- eg. Some changes mandate a restart of an instance. A change for one config may have an impact on load balancing for the other environment.
- Complexity of a single configuration
- Dependencies on external factors. (DNS resolution of hostnames/firewalls for port access.)
Conclusions
There are no hard and fast rules to figure out which approach is the best one for you. It will ultimately depend on the requirements for the load balancing. If a configuration is changing frequently and is functionally independent then I would tend to go for the multiple configuration route. If on the other hand simplicity of monitoring and minimal resource footprint alongside a fairly static configuration was the situation I would tend to use the multiple virtual server approach.Essentially the classic IT answer of "it depends" will apply. Only a good understanding of the requirements will clarify which way to go. (Although if you are using OTD 11.1.1.6 then you might be better with the virtual server approach as there are a few limitations to the VIPs using keepalive for the failover groups)
Friday, 31 October 2014
Disaster Recovery of WLS Applications on Exalogic
Introduction
For many years Oracle Fusion Middleware based on WebLogic server has been capable of being used to provide high availability, fault tolerance and disaster recovery capabilities. This has been documented as part of the Maximum Availability Architecture whitepapers. Follow this link for all the MAA documentation or follow this link to go directly to the Fusion Middleware Disaster Recovery architecture documentation.Exalogic/Exadata provides an ideal platform on which these architecture can be realised with all the advantages that come with using Oracle Engineered systems.
This blog posting gives a very high level overview of the principles used in implementing active/passive DR for a fusion middleware application. Much of the activity involved from an application perspective is identical irrespective of the deployment being on physical or virtual hardware. In this article we will have a slightly deeper dive on how the Exalogic ZFS storage appliance is used to enable the DR solution.
Basic principles involved in setting up FMW DR
The basic tenet of deploying an application is to follow a set of rules during the deployment/configuration of the application which will make it simple to start the application up on the DR site. The setup should be:- Deploy all tiers of the application ensuring:-
- In the primary environment a set of hostname aliases are used for all configuration, these aliases not linked to the specific host and all configuration in the products specify these names rather than actual IP addresses.
- The binary files and application configuration (normally the domain homes) are all located as shares on the ZFS appliance and mounted via NFS to the Exalogic vServers.
- Critical application data that must be persisted goes into the Database. Specifically thinking of the WebLogic Transaction logs and the JMS messages. (We will use the Oracle Data Guard product to ensure critical data is synchronously copied to the remote site)
- Keep the configuration in the Operating System to an absolutely minimum possible. Probably no more than /etc/hosts entries and if needed specific service startup commands. Other OS configuration should be built into the templates used to create the environment in the first place.
- Create mirror vServers on the DR site.
- These vServers will be used to host the production environment when DR has occurred. The same minimal OS configuration should be present in this site. To save time in DR the servers can be started up or they can be started on-demand at DR startup. If already running then ensure that the application services are all shutdown. The hosts files must have the same hostname aliases in it that the primary site has but obviously they will be resolving to different IP addresses.
- Create a replication agreement for all the shares that host the application binaries and domains.
- When DR is to happen (ignoring DB)
- Break the replication agreement
- Export the replicated shares so that they can be mounted.
- Mount the replicated shares in exactly the same location on the DR vServers
- Startup the application on the DR environment
- Test and if OK then redirect traffic at the front end into the DR service.
All these steps can be automated and put into the control of Enterprise Manager such that the element of human error can be removed from the equation during a disaster recovery activity.
Using the ZFS Storage Appliance for Replication
From the application perspective a key function lies with the NAS storage which has to be able to copy an application from one site to another. The ZFS Storage appliance within an Exalogic is a fantastic product that provides exactly this functionality. It is simple to set it up to copy the shares between sites.Setup a Replication Network between sites
The first activity required when wishing to perform DR between two sites is to create a replication network between the ZFS appliance in both Exalogic racks. This can be done using the existing 1GbE management network that already exists, however this is not recommended as this network is not fault tolerant, there being only one 1GbE switch in the rack. However on the ZFS appliance there are two 1/10GbE network connections available on the back of each storage head (NET2 & NET3). By default one connection goes into the 1GbE switch and the other is a dangling cable, thus two independent routes into the data centre are available. If a longer wire is required to connect then it is possible to disconnect the existing ones and put in new cables. (Recommendation - Get Oracle Field Engineers to do this, it is a tight squeeze getting into the ports and the engineers are experts at doing this!)Once each head is connected via multiple routes to the datacenter and hence on to the remote Exalogic rack then you can use link aggregation to combine the ports on each head and then assign an IP address which can float from head to head so it is always on the active head and hence has access to the data in the disk array.
Replicating the shares
Having setup the network such that the two storage appliances can access each other we now go through the process of enabling replication. This is a simple case of setting up the replication service and then configuring replication on each project/share that you want coped over. Initialy setup the remote target where data will be copied to. This is done via the BUI, selecting Configuration, and then the Remote Replication. Click on the + symbol beside "Targets" to add the details (IP address and root password) of the remote ZFS appliance. |
| Adding a replication target |
To setup replication using the BUI simply click on the Shares and either pick a share or click on the Projects and edit the project level. There is then a replication sub-tab and you can click on the "+" symbol to add a new "Action" to replicate.
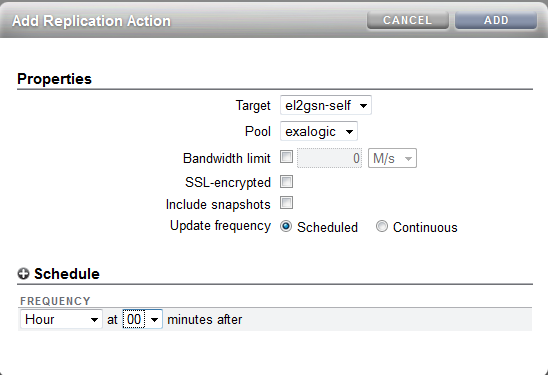 |
| Replication of a project |
Obviously the latter two options have an impact on the quantity of data copied and the performance is worse if all data has to be travelling encrypted. However, after the initial replication only changed blocks will be copied across and given that the shares are used primarily for binaries and configuration data there will not be a huge quantity flowing between the sites.
Process to mount the replica copies
Having completed the previous steps we have the binaries and configuration all held at the primary site and a copy on the remote site. (Although bear in mind that the remote copy may be slightly out of date! It is NOT synchronous replication.) For DR we now assume that the primary site has been hit by a gas explosion or slightly less dramatic we are shutting down the primary site for maintenance so want to move all services to the DR environment. The first thing to do is to stop the replication from the primary site. If the DR environment is still running then this is as simple as disabling the replication agreement. Obviously if there is no access to the primary then one must assume that replication has stopped.Then on the DR site we want to make the replicated shares available to the vServers. This is acheived by "exporting" the project/share. To navigate to the replica share simply select the Shares and then the Projects listing or Shares listing appropriately. Under the "Projects" or "Filesystems : LUNs" title you can click to see the Local or Replica filesystems. By default the local are shown so click on Replica to see the data coped from a remote ZFS appliance.
 |
| Replicated Projects |
Under the General tab there is the option to "Export", simply select this check box and hit apply and the share will be available to mount by the clients. By default the same mount point that was on the primary site will be used on the DR site.
| Health Warning : When you export a project/share then all shares with the same directory mount point are re-mounted on the client systems. Make sure every project has a unique mount point. If left at the default of /export then the Exalogic Control shares are also re-mounted which has the impact of rebooting compute nodes. |
 |
| Export checkbox to enable share to be mounted |
Once the shares have been exported then the DR vServers can mount the shares, start the application services up and be ready to pick up from the primary site. Finally, create the replication agreement to push data from the DR site back the primary until the failback happens to the primary site.
All the steps for DR once the environment has been correctly setup only take in the order of seconds to complete so the outage for the DR switchover can be taken down to seconds for the technical implementation aspects.
Friday, 13 June 2014
Example of Application Version Management Using OTD
When using Exalogic to host an application it is fairly common to see Oracle Traffic Director (OTD) being used as a load balancer in front of the application. OTD has a rich functional set that can make it more than just a load balancer/proxy - this allows it to perform traffic management/shaping. In a recent engagement I was asked if it could perform application version management, to which the answer is yes.
The solution presented here is just one possible answer to application versioning and there are often many other approaches that should be considered.
There are a number of restrictions that apply:-
The first problem is to figure out how to know if a request is to be routed to the old or new version of the application. Assuming the back end application is an application server it is very likely that a jsessionid cookie will be set for any existing client connection. If not set then we could route what will be a new session onto the new application version. The problem comes with the next request, it will have the jsessionid cookie set and we have no way of knowing if the session is to be routed to the old or the new application version. A solution to this issue is to use OTD to inject an additional cookie into the browser, this cookie can contain the time that it was created. Then we can simply inspect this cookie on each request and if the time it holds is before a cut-off date then route to the old version and if after the cut off then route to the new application.
In summary OTD makes use of a special file the obj.conf file that contains a list of directives to instruct OTD how to handle incoming HTTP requests. Many of the changes done through the OTD administration console or command line end up as directives in this file. In addition to the commands that are neatly wrapped up in the console interfaces there are additional directives and functions that can be added by editing the correct obj.conf file by hand. Inserting a cookie is one such SAF.
The first activity is to understand which file to edit. If you simply do a search from the command line under the OTD instances directory for all *.obj.conf files you will see that there are multiple copies of files held. This is because each configuration/virtual server has its own copy of the file and these are held centrally in a repository and copied out to the running instances when changes are deployed. In our scenario we are wanting to change the HTTP processing for a particular "Virtual Server" as part of an OTD configuration. The path to the file we are interested in is:-
This resides on the server that is hosting the OTD administration server which manages all the obj.conf files for all the configurations/virtual servers used. The <virt-server>-obj.conf file is the copy held in the repository, it can be edited to add a section that will inject the cookie. Having edited the file then either use the command line (tadm) or the browser to deploy the configuration file. The action of deploying the config file will copy the configuration to the running instances and update them so that they use the new configuration. This update is done dynamically and does not require any downtime of the OTD instance.
A sample directive to add the cookie is shown below:-
So in this case if the cookie has not been presented to OTD by the client browser then OTD will add a cookie called "MyApp" with a value of the current time. (In seconds since the epoch). The client will then present this cookie in all subsequent requests. It is possible to set additional options such as the domain and path which can specify when the client will send the cookie or to set a max-age parameter which will make the cookie persistent with the browser and last for the duration specified, in seconds. In our example the max-age is not set so the cookie will last for the duration of the session. (until the browser is shutdown)
Handy Hint
With unix it is fairly easy to get the current time in seconds since the epoch using the # date +%s command which will simply format the current date. Or to convert from a number of seconds to a meaningful date use # date -d @1402655677
In our scenario we are going to add a routing rule that will inspect the "MyApp" cookie and if the value is greater than a set time then route the request to the next version of the application. This could be as simple as routing to a different origin server pool if the new application has been setup in an entirely different set of WLS instances, or as in this case the rule will cause a re-write of the request to access a different URL where the two applications (new and old) are both held in the same application server but with different base URLs.
These rules can then be deployed to the server instances which again is done dynamically with no down time. Then when the clients access the service if not present they will have the "MyApp" cookie added to their browser and each request is then checked against the cookie value and if the value is greater than the time specified in the rule then the request will be routed to the second version of the application. Sessions that started on before the cutoff time will continue to use the previous version of the application using the default rules. (or other routing rules.)
The changes to the routing rules are reflected in the obj.conf file as shown below.
Obviously once the previous application version has been fully retired then the default rule can be used to direct to the new version and this routing rule deleted. Potentially the cookie injection can also be removed.
The solution presented here is just one possible answer to application versioning and there are often many other approaches that should be considered.
Problem Statement
The scenario we are looking at here is a situation where a new JEE application is being deployed to an application server and the new version is to be set live on a particular date/time. Existing sessions with the old application are to carry on using the previous version of the application until their sessions expire.There are a number of restrictions that apply:-
- No changes to the underlying application. (For example, WLS has the concept of versioning built into it but the application code - descriptors - must be altered to use this. In our scenario we are using a third party application and do not have the ability to make any changes.)
- No application down time is allowed. (App is accessed 24*7)
- Existing sessions remain on the previous version and new sessions use the new version
Solution Overview
The solution used makes use of the routing rules that are available in OTD. Essentially inspecting the HTTP requests that hit OTD and determine if the request should remain on the old application version or be routed to the new version.The first problem is to figure out how to know if a request is to be routed to the old or new version of the application. Assuming the back end application is an application server it is very likely that a jsessionid cookie will be set for any existing client connection. If not set then we could route what will be a new session onto the new application version. The problem comes with the next request, it will have the jsessionid cookie set and we have no way of knowing if the session is to be routed to the old or the new application version. A solution to this issue is to use OTD to inject an additional cookie into the browser, this cookie can contain the time that it was created. Then we can simply inspect this cookie on each request and if the time it holds is before a cut-off date then route to the old version and if after the cut off then route to the new application.
Solution Detail
Injecting a Cookie
The first activity is to use OTD to inject a cookie into the HTTP response that goes back to the client. This can be done using the Server Application Functions (SAFs) that OTD supports, these are documented in this link. (Although check for newer documentation releases from here.)In summary OTD makes use of a special file the obj.conf file that contains a list of directives to instruct OTD how to handle incoming HTTP requests. Many of the changes done through the OTD administration console or command line end up as directives in this file. In addition to the commands that are neatly wrapped up in the console interfaces there are additional directives and functions that can be added by editing the correct obj.conf file by hand. Inserting a cookie is one such SAF.
The first activity is to understand which file to edit. If you simply do a search from the command line under the OTD instances directory for all *.obj.conf files you will see that there are multiple copies of files held. This is because each configuration/virtual server has its own copy of the file and these are held centrally in a repository and copied out to the running instances when changes are deployed. In our scenario we are wanting to change the HTTP processing for a particular "Virtual Server" as part of an OTD configuration. The path to the file we are interested in is:-
<OTD Instance Home>/admin-server/config-store/<configuration name>/config/<virtual server name>-obj.conf |
This resides on the server that is hosting the OTD administration server which manages all the obj.conf files for all the configurations/virtual servers used. The <virt-server>-obj.conf file is the copy held in the repository, it can be edited to add a section that will inject the cookie. Having edited the file then either use the command line (tadm) or the browser to deploy the configuration file. The action of deploying the config file will copy the configuration to the running instances and update them so that they use the new configuration. This update is done dynamically and does not require any downtime of the OTD instance.
A sample directive to add the cookie is shown below:-
<Object name="default"> AuthTrans fn="match-browser" browser="*MSIE*" ssl-unclean-shutdown="true" NameTrans fn="assign-name" id="default-route" name="default-route" NameTrans fn="map" from="/" to="/" <If not defined $cookie{"MyApp"}> ObjectType fn="set-cookie" name="MyApp" value="$time" </If> Service fn="proxy-retrieve" method="*" AddLog fn="flex-log" </Object> <Object name="default-route"> ... |
So in this case if the cookie has not been presented to OTD by the client browser then OTD will add a cookie called "MyApp" with a value of the current time. (In seconds since the epoch). The client will then present this cookie in all subsequent requests. It is possible to set additional options such as the domain and path which can specify when the client will send the cookie or to set a max-age parameter which will make the cookie persistent with the browser and last for the duration specified, in seconds. In our example the max-age is not set so the cookie will last for the duration of the session. (until the browser is shutdown)
Handy Hint
With unix it is fairly easy to get the current time in seconds since the epoch using the # date +%s command which will simply format the current date. Or to convert from a number of seconds to a meaningful date use # date -d @1402655677
Setting up a Routing Rule
Having added the cookie we now have something that we can easily use to route with. This can be done either by editing the obj.conf file directly or using the browser interface which provides some help in ensuring that the syntax is correct. To add/edit routing rules simple ensure that you have selected the configuration you want to manage and then open up the virtual server in the navigation pane and it is possible to then add the routing rules.In our scenario we are going to add a routing rule that will inspect the "MyApp" cookie and if the value is greater than a set time then route the request to the next version of the application. This could be as simple as routing to a different origin server pool if the new application has been setup in an entirely different set of WLS instances, or as in this case the rule will cause a re-write of the request to access a different URL where the two applications (new and old) are both held in the same application server but with different base URLs.
 |
| Routing rules to direct requests to the new app version |
These rules can then be deployed to the server instances which again is done dynamically with no down time. Then when the clients access the service if not present they will have the "MyApp" cookie added to their browser and each request is then checked against the cookie value and if the value is greater than the time specified in the rule then the request will be routed to the second version of the application. Sessions that started on before the cutoff time will continue to use the previous version of the application using the default rules. (or other routing rules.)
The changes to the routing rules are reflected in the obj.conf file as shown below.
| # # Copyright (c) 2014, Oracle and/or its affiliates. All rights reserved. # # You can edit this file, but comments and formatting changes # might be lost when you use the administration GUI or CLI. <Object name="default"> AuthTrans fn="match-browser" browser="*MSIE*" ssl-unclean-shutdown="true" <If defined $cookie{"MyApp"} and $cookie{"MyApp"} gt "1402483929"> NameTrans fn="assign-name" id="myapp-v2" name="myapp-v2" </If> NameTrans fn="assign-name" id="default-route" name="default-route" NameTrans fn="map" from="/" to="/" <If not defined $cookie{"MyApp"}> ObjectType fn="set-cookie" name="MyApp" value="$time" </If> Service fn="proxy-retrieve" method="*" AddLog fn="flex-log" </Object> <Object name="default-route"> Route fn="set-origin-server" origin-server-pool="origin-server-pool-1" </Object> <Object name="myapp-v2"> NameTrans fn="map" to="/MyApp-v2" from="/MyApp" Route fn="set-origin-server" origin-server-pool="origin-server-pool-1" </Object> |
Obviously once the previous application version has been fully retired then the default rule can be used to direct to the new version and this routing rule deleted. Potentially the cookie injection can also be removed.
Conclusion
With a very simple configuration consisting of a single cookie injection and a routing rule it is possible to use Traffic Director to manage different application versions.Monday, 10 March 2014
EM12c and Exalogic 2.0.6
Introduction
In an earlier posting I wrote about the process used to integrate a virtualised Exalogic rack with EM12c. Since that article was written both EM12c and Exalogic have had an upgrade. This posting is a short one to highlight the changes done/work needed to get the following combination of products working together:-- Exalogic - 2.0.6.n.n
- EM12c - 12.1.0.3.0
- Oracle Virtualization - 12.1.0.5.0
- Oracle Engineered System Healthchecks - 12.1.0.4.0
- Sun ZFS Storage Appliances - 12.1.0.4.0
Agent Deploy
The steps to deploy the agent to EMOC and OVMM is the same as previously mentioned. The changes from the previous instructions are:-- Now EMOC and OVMM are both on the same vServer so there is only one agent that needs to be deployed.
- No need to create the /var/exalogic/info/em-context.info file. However you do need to ensure the /var/log/cellos/SerialNumbers file is created and populated. (See deployment notes)
- The sudo permissions can be simplified down to the oracle user permissions of:-
oracle ALL=(root) /usr/bin/id, /opt/oracle/em12c/agent/*/agentdeployroot.sh
Note 2 - The same process applies to deploying an agent to a guest vServer. However, be warned I did this on a vServer using the base 2.0.6.0.0 guest based template that had a couple of other small applications on it. The agent deployment uses a reasonable amount of disk space (~1Gb) and during the deployment this can fail. The log on the OMS server was reporting an error "pty required false with no inputs". It turns out that this was because the first step in the "Remote Prerequisite Check Details" performs an unzip of the installation media which was running out of disk space and hanging. Killing the unzip process caused the step to fail and indicate that the likely cause was disk space. To avoid this in the first place ensure there is adequate disk space on the vServer.
Note 3 - In order to ensure that a vServer is discovered correctly as part of the Exalogic rack it is necessary to ensure that the file /var/log/cellos/SerialNumbers is generated from the dmidecode command output. The script shown below can be used to generate this. Simply cut and paste this into a file called generateSerialNo.sh, make it executable and run it on the vServer.
| serialCode=`dmidecode |grep Serial|grep -v Not|cut -d ":" -f2|cut -d " " -f2` if [ -f /var/log/cellos/SerialNumbers ]; then echo "File /var/log/cellos/SerialNumbers already exists." else mkdir -p /var/log/cellos echo "====START SERIAL NUMBERS====" > /var/log/cellos/SerialNumbers echo "==Motherboard, from dmidecode==" >> /var/log/cellos/SerialNumbers echo "--System serial--" >> /var/log/cellos/SerialNumbers echo "$serialCode" >> /var/log/cellos/SerialNumbers echo "--Chassis serial--" >> /var/log/cellos/SerialNumbers echo "$serialCode" >> /var/log/cellos/SerialNumbers fi |
Note 4 - The configuration of the agent will fail if it cannot resolve its own hostname to a valid IP address. i.e. Make sure that /etc/hosts has an entry in it that specifies the hostname of the vServer you are adding. (When creating vServers this does not happen by default as the names put into the /etc/hosts file are <server name>-<Network IP - dash separated>.)
Setup ZFS Appliance target
The setup process for the ZFS appliance is the same as described previously apart from a minor change that is required to the ZFS configuration. During the process of seting up the appliance as a target it is necessary to run the "Configuring for Enterprise Manager monitoring" workflow. This creates the user that will be used by the agent to log onto the appliance and gather the stats. However the user that is created is defined as a kiosk user. It is necessary to deselect this option from the user created (oracle_agent) because EM12c requires access to some other data from the console. If this option is not deselected then EM12c discovers the appliance but raises an alert "Cannot monitor target. Incorrect Credentials"Having corrected the kiosk user then in the EM12c interface select the ZFS target and under Monitoring --> All Metrics select the metrics you are interested in and enable the ones you are interested in. (By default they are disabled.)
Conclusion
The general process for deployment is essentially unchanged, just a few minor variations on a theme.Tuesday, 18 February 2014
Some Exalogic ZFS Appliance security tips and tricks
Introduction
The ZFS appliance that is internal to Exalogic has been configured specifically for the rack, however while it is "internal" there are still a number of configuration options that should be considered when setting up a machine for production usage. This blog posting is not an exhaustive list of all the security settings that can be done for a ZFS appliance but does pick off some configuration values that should be thought about whenever the appliance is being setup for use.User Security
Once an Exalogic rack has been installed by default there will be a single root user of the ZFS array defined. It is likely that other roles may need to create and manage storage space for their specific accounts. Handing out the root privileges to other users is not recommended.The permissions are determined via a three layered system.
- Authorizations
- Configuration items have CRUD (Create, Read, Update, Delete) like actions that can be taken.
- Roles
- Each role defines a number of authorizations that can be performed by a user with that role
- User
- Defines either a local or remote directory based user that is allowed to authenticate to the ZFS appliance, the roles and hence authorizations will determine which activities the user is able to perform.
Consider a scenario where the vDC is to be setup with an account that will host all vServers for Application A, the application may require some shares created to host the binaries and configuration files. The machine administrator can initially create a project, say called application_a. Then the role for administrating the project can be created. To do this click on Configuration --> Users and click on the + symbol beside the Roles to create a new role.
 |
| Create role to administer shares for a specific project |
Having created the role we now need to create a user and allocate the role to that user.
 |
| Creating a user with restricted permissions |
In the example shown above we create a local user that will only have the role to administer the Application A project as limited by the selection of the roles associated with the user.
Should that user then attempt to make a change to anything other than their project/share the system will respond with the following message.
 |
| Error reported when the authorisation has not been granted. |
Project/Share Security
Having defined a user with limited access to the ZFS device we now turn our attention to the configuration that provides a level of security to help prevent malicious attacks on an NFS mounted share. Most of the configuration settings for a share can also be set at the project level, as such we will discuss these first and remember that if necessary the inheritance can be overridden to give an individual share a unique configuration.- General
- Space Usage
- The quota can be used to prevent any shares in this project from exceeding a set size. Handy to set to ensure that this project does not use all the available disk space on the device.
- Mountpoint
- Not strictly a security feature but it is good practice to always ensure that the project has a unique mountpoint defined. By default a share will append the share name onto the project's mountpoint to determine the location in the ZFS appliances directory structure the data for the share. A format that we use is to have all shares given a mount point of /export/<project name>/<share name>
- Read Only
- Obviously not possible in many cases but certainly at the share level you may wish to have the share setup as Read/Write initially and then change it to be read only so that users cannot accidentally delete the data on it. (For example a binaries only filesystem.) During upgrades it could be switched back to read/write for the duration of the patching.
- Filesystems - LUNS
- Not directly applicable for Exalogic today but certification to use the iSCSI facility of the ZFS appliance is underway. At which point then setting the user, group and permissions for LUNs created will be required.
- Protocols
- NFS
- Share Mode
- Set to None so that by default a client cannot mount the filesystem unless they have specifically been given permission as an exception
- Disable setuid/setgid file creation
- Really down to the usage of the filesystem - see wikipedia for details on setuid/setgid.
- Prevent clients from mounting subdirectories
- Obviously security related but it will be up to the individual usecase to determine appropriate usage.
- NFS Exceptions
- Having set the share mode to None the usage of NFS Exceptions to allow clients to mount the share is mandatory. There are three mechanisms available to restrict access to a particular host or set of hosts. Restricting by Host with a fully qualified domain name, by DNS domain or by network.
In general I have found the restriction by network to be the most useful but that is partly because DNS domains are often not used when setting up for short term tests. When using the Network Type specify the "entity" to be a network using the CIDR notion. So for example, I might want to restrict the share to only vServers in the network range 172.17.1.1 through to 172.17.1.14 in which case the entity should be set to 172.17.1.1/28. The netmask can be taken down to an individual IP address /32 if only one vServer is allowed to mount the share.
The access mode set to read/write or read only as is needed for the share usage.
Root Access indicates if the root user on a client machine would have the root access to files on the share. In general NFS terminology this is known as root squash.
 |
| Example NFS setup |
- HTTP, FTP & SFTP
- Leave with share mode of None unless there is a specific need to allow these protocols to access data held on the share.
- Access
- This is a tab that has specific information for a share (other than the ACL Behaviour) so should be set independently for each share. The Root Directory Access specifies the user/group and the file permissions that will be applied to the share when mounted on the client machine. If using NFSv4 and hence some sort of shared user repository then the user and group are validated against this store, otherwise you can use values such as nobody:nobody to specify the user:group or enter the UID/GID of the users. These IDs must map onto a user:group ID in the client machine. The directory permissions set according to the needs of the application.

- ACL
- Very fine grained access to files and directories is managed via Access Control Lists (ACLs) which describe the permissions granted to specific users or groups. More detail available from Wikipedia or in the NFSv4 specification (page 50) that is supported by the ZFS appliance. In general I have found the default settings have been enough for my needs where the world can read the ACLs but only the owner has permission to change/delete them.
Administration Security
The ZFS appliance has many configuration settings however to lock down the appliance it is possible to turn off a number of the services or re-configure them from the default to minimise risk of intrusion.- Data Services
- NFS
- On a physical Exaloigc you can specify only to support NFSv4 however on virtual NFSv3 is used by the control stack so must remain a supported version.
- When using NFSv4 it is also necessary to specify the identity domain. (See my earlier posting about setting up LDAP to use for shared authentication.)
- iSCSI - If not used then disable the service. (As of Exalogic 2.0.6.1.0 iSCSI is only supported for the Solaris Operating System. In future releases it will also be supported for Linux/virtualised racks.)
- SMB, FTP, HTTP, NDMP, SFTP, TFTP can all be disabled unless specifically needed for some function. (For example, I quite often use the HTTP service to allow easy access to some media files or to host a yum server.)
- Directory Services
- Generally use either NIS, LDAP or Active Directory for a shared identity store. Turn off the services you are not using.
- System Settings
- Most of the system settings are useful to have enabled on the rack. The default settings of having Phone home and Syslog disabled are the best bet.
- Remote Access
- SSH is almost certain to be required to administer the device via the CLI and using scripted configurations. However if you setup another user with all necessary permissions then it is possible to change "Permit root login" to deselect this option. This means that it will no longer be possible to use the root account to ssh onto the rack. NOTE - If using exaBR, exaPatch, exaChk etc. then these rely on ssh access as root so the flag would need to be toggled back prior to running these tools.
 |
| Preventing administration on a particular interface |
The effect of deselecting "Allow Administration" on the interface means that a browser will see an "Unable to connect" error and if the ssh interface is used then the following message is shown.
| # ssh donald@172.17.0.9Password: Password: Last login: Tue Feb 18 11:51:00 2014 from 138.3.48.238 You cannot administer the appliance via this IP address. Connection to 172.17.0.9 closed. |
Summary
In conclusion, there are actually relatively few actions to be taken from the default settings of an Exalogic ZFS appliance but the following should always be considered:-- Setup users to administer the projects and shares that are limited to only have write access to the shares they need.
- For each share make certain that only the protocols that are needed are allowed access (normally NFS only, and potentially iSCSI in the future) and ensure that only specific hosts are allowed to mount the shares
- Prevent administration on the networks that are connected to guest vServers.
Tuesday, 11 February 2014
Websocket support in Oracle Traffic Director
Introduction
In recent releases the Websockets function has been added as a capability to both WebLogic 12.1.2 and Oracle Traffic Director (11.1.1.7.0). This blog posting is another courtesy of my colleague Mark Mundy who has been doing some investigation into what is involved to setup an architecture with a browser accessing a web application running websockets on WebLogic and proxied/load balanced through OTD.
The WebLogic documentation covers the setup of Websockets at the server side and the OTD documentation explains what is needed for the load balancer. This blog posting is intended to show how the two can be used together on the latest Exalogic virtualised release to have OTD load balance a simple example websocket application with relative ease. This posting will not go through every aspect of the setup as the assumption is that the reader has some familiarity with Exalogic Control, WebLogic and OTD.
The
example application being used is the one that ships as part of the
example set for WebLogic 12.1.2 with a slight modification as will be
highlighted.
The deployment topology that is used in this scenario is shown below.
 |
| WebSocket deployment Topology - Browser --> OTD Load Balancer --> Application(WLS Cluster) |
Setting up the Exalogic Environment
Depending on how complex you want to make the environment, will determine what needs to be set up. In order to demonstrate the basic load balancing while ensuring that there is no direct network connectivity between the client browser and the back end WLS managed server hosting the websocket application, a minimum of 2 vServers would be needed. In order to test out features such as load balancing during failure scenarios at both WLS and OTD ideally 5 would be created. For this example it will be assuming 5 vServers are created and the topology reflected in the following diagram shows the networking setup.
 |
| Exalogic vServer deployment topology |
WebLogic Installation and Configuration
WebLogic 12.1.2 is the minimum version that can be used for Websocket support, select the 12c Generic Download from the Oracle download site. (This will have a dependency on the latest 64bit java version so if not already installed on your vServers then install prior to installing WLS.)Install the Complete Installation of WLS 12.1.2 using the installed 64 bit Java 7. Installing the complete installation will ensure the example applications are available and it is the Websockets example that will be used. Once WLS is installed complete the post installation configuration to ensure this happens. For more details on getting the examples available see this link
The specific websockets example application used in this document will be introduced after a specific WLS domain is created to host it.
Rather than use the WLS examples domain a new domain will be used so as to keep things as simple as possible but at the same time allowing the ability to have more flexibility in the testing. Further detail about the WLS implementation is available in the documentation.
A new WLS domain needs to be created using the domain wizard. In the topology shown above the two instances in a cluster that listen on the private vNet and the administration server uses this network as the default but also has an additional HTTP channel setup to listen on the EoIB public network so that administration becomes simple from outside the Exalogic rack. The websocket application can then be deployed to the cluster such that is is only accessible to the client population through the OTD tier, providing a level of security.
The example that ships with WebLogic will only work in the scenario where the browser and WLS managed server are both on the same host. To resolve this issue we make a small change to the code in the example before building the application and deploying to the cluster. In the example source code identify exampleScript.js and change the line that opens up the websocket.
This Javascript file is normally located in:-
<WLS_Home>/user_projects/applications/wl_server/examples/src/examples/webapp/html5/webSocket/src/main/webapp/script
Use your editor of choice and search for "localhost:7001" and replace it with " + window.location.host +" as shown below.
| ...
if (ws == null) { ws = new WebSocket("ws://localhost:7001/webSocket/ws"); ws.onopen = function() { addMsg("Server Msg: WebSocket has been started."); }; ... becomes ... if (ws == null) { //ws = new WebSocket("ws://localhost:7001/webSocket/ws"); ws = new WebSocket('ws://' + window.location.host + '/webSocket/ws'); ws.onopen = function() { addMsg("Server Msg: WebSocket has been started."); }; ... |
The directory <WLS_Home>/user_projects/applications/wl_server/examples/src/examples/webapp/html5/webSocket contains full instructions on building and deploying the application. In our case we only need to re-build the application (ant build) and then use the standard WLS admin console (or WLST or ant if you prefer) to deploy the war file created to the WebLogic Cluster.
Oracle Traffic Director Installation and Configuration
For Websocket support we need to ensure that we install OTD 11.1.1.7.0 or higher. In our scenario we will install OTD onto the admin vServer and the two OTD instance vServers to end up with an HA cluster hosted on the two instance vServers that will route requests through to the backend WLS cluster. It is useful to enable monitoring on OTD so that we can easily spot the sessions being created in OTD and through to the back end WLS instances. To enable monitoring highlight the virtual server and enable the plain text report. As shown below. |
| Enable plain text monitoring in OTD |
Websocket support is enabled by default in OTD so there is nothing else other than the deployment of the configuration to the cluster before we test out our Websocket application. However for information if there is a desire to disable websockets for a particular route then this can be achieved via the enable/disable of the "WebSocket Upgrade" for a given route.
 |
| Enable/Disable Websocket support in OTD. |
With the monitoring in place it is then possible to access the plain text report by accessing the URI http://OTD IP address:port/.perf where the Origin Server statistics are of particular interest. As highlighted below.

Testing the application
In another browser session/tab it is then possible to access the OTD instance with the URN /websocket. You can then click the start button to open up the socket and enter text to send to the server. Currently you should use either Chrome or Firefox but not Internet Explorer as it does not support websockets. |
| WLS WebSocket example application |
By starting up additional browser sessions you can create multiple websockets and the .perf output will reflect the load balancing to the back end WLS instances.

In this example we can see that 3 websocket sessions have been created and they have been load balanced round the two available WLS server instances.
Behind the scenes what is actually happening is that there are two socket connections created for each WebSocket. The first is between the client browser and the OTD instance and the second from OTD to the WLS instances. OTD acts to bridge the gaps between the two. Below is the output from netstat on the OTD instance to show these socket connections.
| Browser to OTD instance. # netstat -an Active Connections Proto Local Address Foreign Address State TCP 138.3.32.68:52732 138.3.49.9:8080 ESTABLISHED & OTD to WLS # netstat -an | grep 7003 tcp 0 0 192.168.16.74:39223 192.168.16.71:7003 ESTABLISHED |
The nature of establishing multiple sockets to link the load balancer to the back end service means that in the event of a failure by either OTD or WLS then the socket connection will be broken and the client must re-establish the socket again. Thus for HA connections there is a dependency on the client capturing any exceptions and re-establishing the connection.
Note:- If OTD is setup with a failover group (HA config) then one instance is primary and the second acts as a backup. Should the primary fail then the websocket would have to be re-established using the backup OTD instance. Once the primary is available again OTD will automatically fail back which will again break the websocket connection.
Friday, 31 January 2014
Running DNS (bind) for a private DNS domain in Exalogic
In an earlier post I described a process to setup bind to provide a relay DNS service that can be accessed from internal vServers and the shared storage. This provides an HA DNS service to the shared storage in particular as without such a setup it will be relying on the non-HA 1GbE network for access to DNS.
The next obvious step in the process is to extend your bind configuration so that a local DNS service can be used for the vServers you create. This would give name resolution for guests that you do not want included in the external DNS service.
The first step is to setup bind or the named daemon as described in my earlier blog entry. Ensure that the vServer you are using for the DNS service is connected to an EoIB network and the shared storage, this will mean that it becomes attached to three networks in total.
Once bind is operational then we can extend the named configuration to include details for an internal domain to the Exalogic rack. So in this example our datacenter DNS runs on a domain of mycompany.com, for lookups internal to the Exalogic we want to use the domain el01.mycompany.com where el01 represents the Exalogic rack name. The first step is to edit the main configuration file and add another section to specify that the bind service will be the master for the el01.mycompany.com domain.
The extra section specifies that we will have a zone or DNS domain el01.mycompany.com. Within this zone this DNS server will be the master or authoritative source for all name resolution. There is a file called el01 which will be the source of all the IP addresses that are served by this server. Earlier in the configuration is the line
directory "/var/named";
This specifies the directory that the named daemon will search in for the file called el01. The content of the file is as shown below.
The properties or directives in the zone file are:-

The next obvious step in the process is to extend your bind configuration so that a local DNS service can be used for the vServers you create. This would give name resolution for guests that you do not want included in the external DNS service.
The first step is to setup bind or the named daemon as described in my earlier blog entry. Ensure that the vServer you are using for the DNS service is connected to an EoIB network and the shared storage, this will mean that it becomes attached to three networks in total.
- the EoIB network which will give it access to the main DNS service in the datacenter,
- the vServer-shared-storage which will allow the ZFS appliance to use this as a DNS server
- the IPoIB-virt-admin network. This is a network that is connected to all vServers so if we make the vServer a full member of this network as described earlier in a post about setting up LDAP on the rack then all vServers created can utilise the DNS services. All we need to is to configure the network to use the domain service.
Once bind is operational then we can extend the named configuration to include details for an internal domain to the Exalogic rack. So in this example our datacenter DNS runs on a domain of mycompany.com, for lookups internal to the Exalogic we want to use the domain el01.mycompany.com where el01 represents the Exalogic rack name. The first step is to edit the main configuration file and add another section to specify that the bind service will be the master for the el01.mycompany.com domain.
# cat /etc/named.conf options { directory "/var/named"; # Hide version string for security version "not currently available"; # Listen to the loopback device and internal networks only listen-on { 127.0.0.1; 172.16.0.14; 172.17.0.41; }; listen-on-v6 { ::1; }; # Do not query from the specified source port range # (Adjust depending your firewall configuration) avoid-v4-udp-ports { range 1 32767; }; avoid-v6-udp-ports { range 1 32767; }; # Forward all DNS queries to your DNS Servers forwarders { 10.5.5.4; 10.5.5.5; }; forward only; # Expire negative answer ASAP. # i.e. Do not cache DNS query failure. max-ncache-ttl 3; # 3 seconds # Disable non-relevant operations allow-transfer { none; }; allow-update-forwarding { none; }; allow-notify { none; }; }; zone "el01.mycompany.com" in{ type master; file "el01"; allow-update{none;}; }; |
The extra section specifies that we will have a zone or DNS domain el01.mycompany.com. Within this zone this DNS server will be the master or authoritative source for all name resolution. There is a file called el01 which will be the source of all the IP addresses that are served by this server. Earlier in the configuration is the line
directory "/var/named";
This specifies the directory that the named daemon will search in for the file called el01. The content of the file is as shown below.
# cat el01 ; zone file for el01.mycompany.com $TTL 2d ; 172800 secs default TTL for zone $ORIGIN el2h.mycompany.com. @ IN SOA proxy.el01.mycompany.com. hostmaster.el01.mycompany.com. ( 2003080800 ; se = serial number 12h ; ref = refresh 15m ; ret = update retry 3w ; ex = expiry 3h ; min = minimum ) IN NS proxy.el01.mycompany.com. MX 10 proxy.el01.mycompany.com. ; Server names for resolution in the el01.mycompany.com domain el01sn-priv IN A 172.17.0.9 proxy IN A 172.16.0.12 ldap-proxy IN CNAME proxy |
The properties or directives in the zone file are:-
- TTL - Time to live. If there are downstream name servers then this directive lets them know how long their cache can be valid for.
- ORIGIN - Defines the domain name that will be appended to any unqualified lookups.
- SOA - Start of Authority details
- The @ symbol places the domain name specified in the ORIGIN as the namespace being defined by this SOA record.
- The SOA directive is followed by the primary DNS server for the namespace and the e-mail address for the domain. (Not used in our case but it needs to be present)
- The serial number is incremented each time the zone file is updated. This allows the named to recognise that it needs to reload the content.
- The other values indicate time periods to wait for updates or to force refresh slave servers.
- NS - Name service - Determines the fully qualified domain for servers that are authoritative in this domain.
- MX - Mail eXchange, defines the mail server where mail sent to this domain is to be sent.
- A - Address record is used to specify the IP address for a particular name
- CNAME - The Cannonical Name which can be used to create aliases for a particular server.
- The storage head under the name el01sn-priv. This means that all vServers will automatically be able to resolve by name the storage for use with NFS mounts.
- proxy (or ldap-proxy) is the name that we are using for a server where OTD is installed and configured to be a proxy for an external directory. Thus enabling all vServers to access LDAP for authentication. (Useful for NFSv4 mounts from the shared storage.)
Subscribe to:
Posts (Atom)